TM 5-4210-233-14&P-2
6-6. FIRE PUMP - Continued
(10)
Remove the remaining cap screws (13) and washers (14) attaching the drive shaft housing (11) to
the mid-section (15). The housing (11), gasket (33) and the drive shaft (34), drive sprocket (24),
shift collar (35) and associated parts can now be removed as a unit from the mid-section (15). The
shift fork (36) will slip off the shift shaft (37) when the drive shaft (34) assembly is lifted out.
Remove shifter shoe (38) from locking arm (39). Discard gasket.
(11)
Slip locking arm (39) off pivot pin (40).
NOTE
The pivot pin (40) and shift shaft bushing (41) need only be
removed if bent or otherwise damaged. If pivot pin (40) is
removed replace O-ring (40A).
(12)
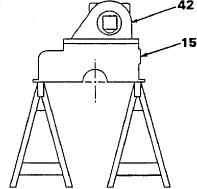
Reposition mid (15) and cap (42) section assembly on the supports so that the cap (42) portion is
on top as shown, or set the assembly on a bench.
(13)
Remove four screws (43) and washers (44) that fasten oil pump (45) to pump support housing and
remove oil pump (45) and gasket (46). Do not remove two small screws that fasten the pump
together. Remove oil pump adapter (47) and shims (48) by removing screws (49) and washers (50).
Discard gaskets (46). Note number of thickness of shims for assembly.
(14)
Remove pin attaching shift arm (52) to shift shaft (37). Remove shift arm (52), spring (53), sleeve
(54), and pins (55 and 56). Remove shift shaft (37) and attached sector gear (57) from inside of
the mid-section (15). Spacer (58) will fall free as shift shaft (37) is removed.
(15)
Press out bushings (59) from mid-section. O-ring (60) between bushings (59) will come out when
the bushings are removed. Discard O-ring.
(16)
Remove pin (61) that attaches the sector gear (57) to the shift shaft (37) and remove the sector
gear (57).
(17)
Remove cap screws (62) and lockwashers (62A) that attach the cap (42) to the top of the mid-
section (15).
(18)
Remove cap (42) and its driven sprocket (26) from the top of the mid-section. Rapping the cap
(42) with a soft hammer will break adhesion with the mid-section (15) and free the dowels (63A)
between the cap (42) and mid-section (15).
CAUTION
Do not drive the dowels (63A) through the flange of the cap (42)
deeper into the mid-section (15).
(19)
Remove 4 cap screws (63A) and lockwashers (63B) that fasten housing (15) to cap (42) and
remove housing.
6-16

