|
| |
TM 750-116
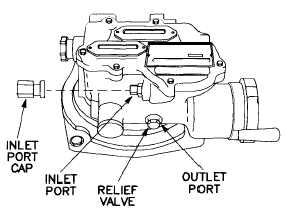
d. Quadrant, M17, (fig. 3-39).
NOTE
While purging the quadrant, ensure the pressure
relief valve is working by checking for nitrogen
gas escaping from the valve.
Figure 3-39 M17 and M18 Quadrants
(1) Perform purging and charging procedure para
2-5.a.
(2) Purge instrument at 7 psig for 5 minutes.
(3) Turn pressure regulator off (CCW) and note when
relief valve closes.
(4) If relief valve closes before reaching 1 psig, re-
move hose assembly and depress valve core until all pres-
sure has escaped.
(5) Charge instrument at 1 psig for 60 seconds.
(6) Leak test for a minimum of 5 minutes.
e. Quadrant, M18 (fig. 3-39). Refer to para
3-11. d. for procedures.
3-12. RANGEFINDERS.
a.
Laser.
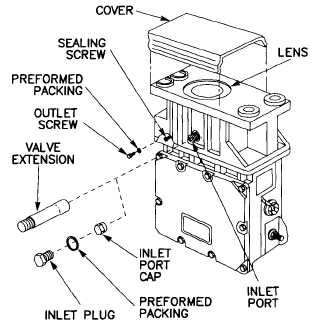
(1) Optical Cavity (fig. 3-40).
NOTE
See appendix C for Service Kit containing re-
placement parts for M1 and M1A1 Tanks.
Figure 3-40 Laser Rangefinder Optical Cavity
(a) Remove cover and check lens for cracks and
breaks. If damage is evident, do not attempt purging and
charging procedure.
(b)
(c)
(d)
(e)
(f)
(g)
(h)
(i)
Perform purging procedure para 2-5.c.
Remove inlet plug and preformed packing.
Install valve extension on inlet port.
Attach hose assembly to valve extension.
Loosen, but do not remove sealing screw.
Purge instrument at 5 psig for 5 minutes.
While purging, leak test lens area.
Remove hose assembly and valve extension from
inlet port.
(j) Reassemble by tightening sealing screw and in-
stalling cover.
(k) Install inlet port cap. Install inlet plug with pre-
formed packing attached and outlet screw with preformed
packing attached.
3-18
|