|
| |
TRUCK SERVICE MANUAL
TM 5-4210-230-14&P-1
BODIES AND CABS
3.
On a piece of polyethylene place a piece of cloth cut
larger than hole being repaired. Saturate with resin
mixture. Obtain a layer of mat cut larger than the hole
being repaired and position it on the cloth. Saturate
mat also with the resin mixture.
4.
Coat the inner surface of area being repaired with the
resin mixture. When tacky, apply the patch prepared in
item 3. Using the polyethylene sheet press out air
pockets and allow patch to cure.
5.
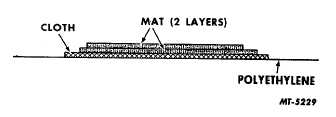
On a piece of polyethylene, place another piece of cloth
larger than hole being repaired. Saturate with resin
mixture. Apply two layers of mat (Fig. 4), saturating
both with the resin mixture. Coat the outer surface of
area being repaired with the resin mixture. When
tacky, position the entire patch on the prepared surface
and press into position. Allow the patch to cure.
Fig. 4
6.
After the inner and outer patches have cured, peel off
the polyethylene and smooth the outer surface. Any of
the polyethylene material left on patch will be removed
when sanded.
7.
In the resulting low spots, apply plastic putty. Then
over the putty place another sheet of polyethylene and
squeeze well to remove all air. When putty has cured,
remove polyethylene and sand down to a feather edge.
Crack or Split:
1.
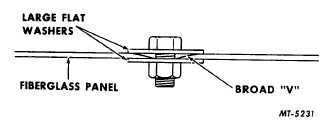
Remove loose material and grind to a broad "V" (Fig.
5). Clean inner panel also.
2.
Align parts. A nut and bolt with large flat washers may
be used to draw parts together. See Fig. 6.
3.
Cut one or two pieces of mat and apply
to inner surface with resin mixture. (On cracks where
excessive stresses may occur, apply two pieces of
mat). Apply a piece of cloth with the resin mixture to
the inner surface also. Extend patches beyond break
about 2". Press the patches firmly into place and allow
to cure. NOTE: It is a recommended procedure to
leave the washer and nut (if used) in the patch if the
mat and cloth were applied over them.
Fig. 5
4.
Mix a fresh supply of plastic putty and apply over the
outside surface filling the large "V" like valley (Fig. 5).
Before the plastic putty cures, remove the bolt and
washer (if used) from the outside and fill the hole with
putty and allow to cure.
Fig. 6
5.
After the putty has cured, sand down to the exposed
surface.
Small Scratches or Chipped Area:
(No damage to basic fiberglass structure)
Remove paint from area being repaired and fill
damaged area with a plastic putty mixture. After area
has cured sand smooth.
FIBERGLASS SERVICE FENDER INSTALLATION (D-400
Series Illustrated)
1.
Remove and place hood assembly on level surface or
support frame. See Fig. 7. Hood should be blocked so
it is horizontal as nearly as possible. See Fig. 8.
CTS-2408 Page 4
PRINTED IN UNITED STATES O F AMERICA
|