|
| |
TRUCK SERVICE MANUAL
TM 5-4210-230-14&P-1
BODIES AND CABS
Scissors
Polyethylene (Plastic Container Bag Material) or
Cellophane Sheets Assorted Bolts, Nuts and Rivets.
SAFETY PRECAUTIONS
Observe The Following When Making Repairs With
Fiberglass
1.
Avoid spilling the resin or hardener on skin or clothing.
If this occurs, remove with paint thinner or denatured
alcohol. Then wash with soap and water. If the mixture
contacts
the
eyes,
flush
thoroughly
with
water
immediately. Continue flushing for at least 15 minutes
and contact physician as soon as possible.
2.
In some cases, some individuals may have skin
sensitivity to the use of these materials. Because of
this, protective creams can be applied to the hands to
guard against irritation.
3.
When protective creams are not available, rubber
gloves may be used to protect the hands. The gloves
can be removed quickly leaving the hands clean for
other work.
4.
When working with fiberglass always work in a well
ventilated area. DO NOT SMOKE OR EXPOSE
FLAME WHERE KITS ARE BEING USED OR
STORED. If possible, obtain a kit of material large
enough to accommodate only one or two jobs to avoid
storing any quantity of this material. Resin liquid must
be kept in a metal container or cabinet when not being
used.
5.
Repairs
must
be
ground
or
sanded
to
match
surrounding contours. When grinding or sanding, it is
advisable to use an approved type respirator during the
operation. Suitable respirators are available under
equipment number SE-1798 and SE-1799. The ground
dust or particles of resin or fiberglass must not be
inhaled, otherwise irritation may occur.
REPAIRING FIBERGLASS
Small Holes (Under 3" Diameter):
1.
Remove damaged material such as loose fiberglass
and bevel the edges (approximately 200). See Fig. 2.
Fig. 2
2.
Remove paint from outside surface with sandpaper.
Clean inner surface (if accessible).
3.
Cut a piece of cloth and a piece of mat so that the
patches will extend past the edges of the hole about 2".
4. Coat both inner and outer surfaces with resin mixture and
saturate both the mat and cloth.
5.
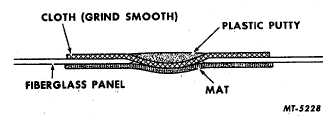
When tacky, apply the mat on the inner surface and the
cloth to the outer surface. Press the two patches
together using polyethylene. A saucer-like depression
should be made. See Fig. 3.
Fig. 3
6.
Allow the material to cure. This is a chemical action
and not a drying action. A hard surface indicates a hard
interior. To hasten curing action heat lamps may be
used about 18" from work. Then smooth the outside
surface. Additional coats of resin mixture may be
added if necessary.
7.
Apply plastic putty to fill the low spots, allow time for
the putty to cure, then smooth the outside surface.
Large Holes (Over 3" Diameter):
1.
Remove damaged material such as loose fiberglass
and bevel the edges (approximately 200). See Fig. 2.
2.
Remove paint from the outside surface with sandpaper.
Clean the inner surface also if it is accessible.
CTS-2408 Page 3
PRINTED IN UNITED STATES OF AM ERICA
|


