|
| |
TRUCK SERVICE MANUAL
TM 5-4210-230-14&P-1
BODIES AND CABS
GENERAL
The information contained in this manual section has
been prepared to provide service personnel with a ready
reference to step-by-step procedures for the repair or
replacement of fiberglass components.
Instructions for making fiberglass repairs to sheet metal
are also covered in this section.
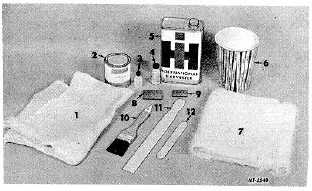
A fiberglass reinforced plastic repair kit (Fig. 1) has been
made available which contains the material needed to repair
either fiberglass or sheet metal components. This kit may be
obtained through regular Service Part channels.
The mixing directions for the resin mixture and plastic
putty are found on the cans.
CAUTION
Do not put mixed material back into cans.
Fig. 1. Fiberglass Repair Kit.
Legend for Fig. 1
Key
Description
1
CLOTH
2
PLASTIC FILLER
3
PLASTIC ACTIVATOR
4
RESIN ACTIVATOR
5
RESIN
6
MIXING CUP (3)
7
MAT
8
SQUEEGEE (1-1/2" x 2")
9
SQUEEGEE (1-1/2" x 1")
10
PAINT BRUSH
11
STIRRING STICK
12
STIRRING STICK
DESCRIPTION
Fiberglass is manufactured from filaments of pure glass
spun into yarn then either woven into a fabric (cloth) or a
loosely bound mat. The cloth or mat is then saturated with a
resin. When the resin cures (hardens) it acts as a binder to
hold the fiberglass together, thus forming a solid panel.
Fiberglass components, such as the hood with fenders
assembly, are formed from laminated sheets of fiberglass
mats held together with a synthetic resin. When the liquid
resin mix cures (hardens) it binds the filaments of glass in the
fiberglass mat creates a solid panel. The glass fiber provides
the strength in the panel while the resin bonds the glass fibers
together and supplies only a limited additional amount of
strength. Therefore when repairing a section, be sure to cover
more than just the hole where the damaged material has been
removed. Always overlap the undamaged portion with
fiberglass patches, so that a more continuous sheet of
reinforced fiberglass results.
Since the material hardens by a chemical action, a hard
surface indicates a hard interior, ready for finishing. The
mixture becomes hot before reaching setting temperature and
then it begins to harden. It reaches full hardness after 48
hours. It can however be sanded and finished before then.
To hasten the curing action or if the working temperature
is below 60° F, hold a heat lamp approximately 18" from work.
NOTE
250° F to 275° F is the high limit for the
material and to go higher might distort the
fiberglass form you are patching. Therefore,
keep a close control over the external heat
supply. Cooler temperature increases the
working time and hardening time.
The paint refinishing method is the same as that
recommended for metal parts with the exception that the
temperature must be kept below 250° F, which means the air
dry process is the most practical method. Either enamels or
lacquers may be used to paint the fiberglass.
TOOLS AND EQUIPMENT NEEDED
Tools and equipment necessary to make repairs on
fiberglass are as follows:
IH Repair Kit (Fig. 1)
Putty Knife
Electrical Drill and Bits
Electrical Grinder or Sander
Respirator
"C" Clamps
Hacksaw Blades and Holder
Files
Acetone or Lacquer Thinner
CTS-2408 Page 2
PRINTED IN UNITED STATES OF AMERICA
|