|
| |
TM 5-4210-220-34
2-19.
ENGINE - Continued
(20)
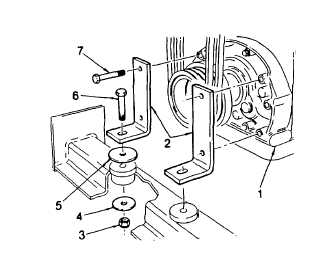
Tighten the engine mount-to-frame cross member capscrews (6) to 135 ft lb (180 Nm).
(21)
Tighten the crankshaft bolt to 180 ft lb (244
Nm).
(22)
Strike the end of the bolt with a sharp blow
using a 2 lb lead hammer.
(23)
Tighten the crankshaftbolt to 300 ft lb (407
Nm).
(24)
Strike the bolt again, with a sharp blow
using a 2 lb lead hammer.
(25)
Retighten the crankshaft bolt to 290 - 310 ft
lb (393 - 421 Nm). Do not strike the bolt
after the final torque has been applied.
The hex head of the crankshaft bolt may be used to bar, or turn, the crankshaft. However, the barring
operation should always be performed in a clockwise direction. It is very important to make certain that the
bolt has not been loosened during the barring operation. Otherwise, serious engine damage may result if
the or pulley is not securely fastened to the crankshaft.
(26)
Install oil pan as detailed in para. 2-19.11.
(27)
Install fan and drive belts, see TM 5-4210-220-12.
(28)
Install engine oil into crankcase, see LO 5-4210-220-12.
(29)
Start and run engine until it reaches operating temperature. Check for oil or coolant leaks, rattles or
vibrations and correct as necessary.
REPAIR
a.
Oil Pump Repair
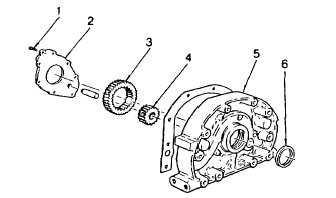
(1)
Remove the self-locking capscrews (1) that
secure the oil pump gear retaining plate (2)
to the crankshaft front cover (5). Separate
the retaining plate from the front cover.
(2)
Remove the oil pump drive gear (3), and
driven gear (4) from the crankshaft front
cover (5).
(3)
Support the outer face of the crankshaft
cover (5).
(4)
Using a hammer and a punch, drive the oil
seal (6) out of the crankshaft front cover.
2-233
|