|
| |
TM 5-4210-220-34
2-19.
ENGINE - Continued
2-19.10
Oil Pump - Continued
(5)
Remove the screen and cover from the oil
inlet pipe assembly.
WARNING
Dry cleaning solvent P-D-680 (safety or Stoddard’s
solvent) is potentially dangerous. Avoid repeated
and prolonged breathing of vapors and skin
contact with the liquid. Do not use near open
flame, arcing equipment or other ignition sources.
Always
wear
eye
protection
and
protective
clothing. The flash point of P-D-680 is 100 to 138
deg. F (30 to 59 deg. C).
(6)
Wash all the oil pump components using
dry cleaning solvent (item 10, Appendix B).
WARNING
Death or serious injury could occur if compressed air is directed against the skin. Do not use compressed air for
cleaning or drying unless the pressure is/has been reduced to 30 psi (2.11 kg/cm2) or less. When working with
compressed air, always use chip guards eye protection and other personal protective equipment.
(7)
Dry all components using compressed air.
(8)
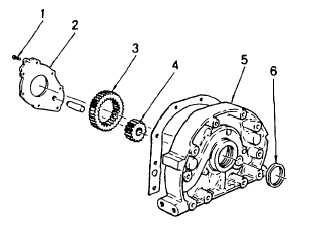
Examine the oil pump gear cavity in the crankshaft front cover. Replace the cover if the surfaces are worn or
scored excessively.
(9)
Replace the driven gear shaft if it is worn or scored excessively. When a new shaft is pressed in place, the
shoulder on the shaft must be flush to 0.020 in. (0.508 mm) below the finished face of the crankshaft front
cover.
(10)
The clearance between the driven gear bushing and the shaft is 0.0010 in. (0.025 mm) to 0.0025 in. (0.064
mm) when new parts are used, or a maximum of 0.0035 in. (0.089 mm) with used parts.
(11)
Inspect the teeth on the oil pump gears and the pump drive hub. Also, examine the bushing in the driven
gear for wear. The bushing is not serviced separately. Therefore, if the bushing is worn, it will be necessary
to replace both the drive and driven gears as they are only serviced as a set. The use of excessively worn
gears will result in low oil pressure which may cause serious damage throughout the engine.
(12)
Inspect the inner face of the oil pump gear retaining plate. Replace the retaining plate if it is scored or worn.
(13)
Reassemble the screen, cover, and oil intake pipe.
(14)
Drive a new 6il seal (6) into the crankshaft front cover (5) using tool J9783 and a hammer. The tool is
designed to drive only on the outer edge of the seal casing to prevent seal damage.
2-234
|

