|
| |
TM 5-4210-220-34
2-19.
ENGINE - Continued
(3)
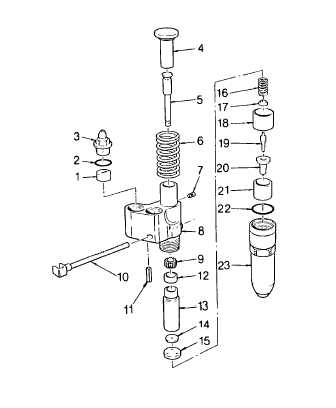
Raise the follower spring (6) with a screwdriver
above the lower land. Hold one hand on the
follower (4) and extract the stop pin (7). Allow
the spring to rise gradually.
(4)
Remove the follower (4), follower spring (6),
and plunger (5) as an assembly
(5)
Invert the injector on the holding fixture and
loosen the injector nut (23) using tool J4983-
01.
(6)
Lift the nut straight up, taking care not to
dislodge the spray tip and valve parts.
(7)
Remove the spray tip (20) and valve parts (19,
18, 17, 16, 15, 14) from the bushing and place
in a clean receptacle If the spray tip is lodged
in the nut, support nut on a wooden block and
drive the tip down through the nut using punch
J1291-02 and a hammer.
(8) Lift off the spill deflector (21) and then lift
bushing
(13)
straight
out
of
body
(8).
(9)
Remove the injector body from the holding fixture, invert and catch the gear retainer (12) and gear (9) as
they fall out of the body.
(10) Withdraw the injector control rack (10) from the body (8). Remove the seal ring (22) from the body.
b.
Inspect and Repair
NOTE
Most injector problems are the result of dirt particles. A clean work area is essential for parts cleaning and
inspection.
WARNING
Dry cleaning solvent P-D-680 (safety or Stoddard’s solvent) is potentially dangerous. Avoid repeated and
prolonged breathing of vapors and skin contact with the liquid. Do not use near open flame, arcing
equipment or other ignition sources. Always wear eye protection and protective clothing. The flash point
of P-D-680 is 100 to 138 deg. F (30 to 59 deg. C).
Death or serious injury could occur if compressed air is directed against the skin. Do not use compressed
air is directed against the skin. Do not use compressed air for cleaning or drying unless the pressure
is/has been reduced to 30 psi (2.11 kg/cm2) or less. When working with compressed air, always use chip
guards eye protection and other personal protective equipment.
2-185
|

