|
| |
TRUCK SERVICE MANUAL
TM 5-4210-230-14&P-1
BODIES AND CABS
6.
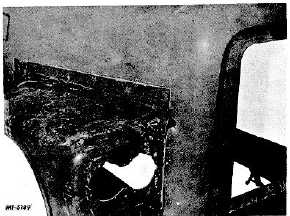
After clamping fender to hood on D-400 series check
position of lower corner of inside rear reinforcement
channel. In some cases, the rear reinforcement
channel corner will not line up with inside hood
channel. See Fig. 10. This is due to slight variations
of hoods. To position correctly, cut off reinforcement
for reinstallation after fender has been attached.
7.
Drill holes from inside of hood through fender flanges
for installation of No. 10 sheet metal screws to hold
fender in place. Holes should be spaced 3 to 4" apart.
Observe fender alignment to hood. See Fig. 11.
Fig. 11 Service Fender Mounting.
8.
Grind or buff all joining edges and radius to normal
thickness on cowl contours. Blow off all surfaces and
corners. Clean with acetone on a soft cloth.
9.
Cut several four inch strips of mat material (2" each
side of seam). Then on a piece of polyethylene
position two layers of mat saturated with the resin
mixture. Apply resin mixture to the inside of hood
where material is being repaired. When tacky, position
the strips (2 layers) over seam. Use the polyethylene
to press out air bubbles. Allow to cure.. Additional
coats of the resin mixture may be applied to the area if
desired. NOTE: If holes are left where the new fender
may not cover the damaged area, repair these places
as outlined in instruction for repairing holes.
10.
Refer to item 6. If required, remount inside rear
channel
reinforcement
corner.
Grind
edges
and
mounting surfaces for proper bonding. Apply saturated
sections
of mat to all edges and seam to hood channel. If
corner positions correctly as applied on fender, apply
mat required to joining seam only. Brush out air
bubbles with a squeegee.
11.
Before proceeding on outside repairs, allow inside
sections to harden. To speed drying or curing time,
apply heat with lamps. No further inside refinishing is
required. Surfaces may be undersealed.
12.
Grind off outside screw threads holding fender in place
just below seam surface. Take grinder or sander and
dish out concave strip approximately one inch wide
along hood and fender seams.
13.
Apply one four inch strip of mat saturated with the resin
along concave hood and fender seams. Next apply a
four inch strip of cloth saturated with the resin mixture
to the fender seams for additional strength. Use a
squeegee or polyethylene sheet to force out entrapped
air. Allow time for assembly to cure. Trim off any mat
overhang at edges.
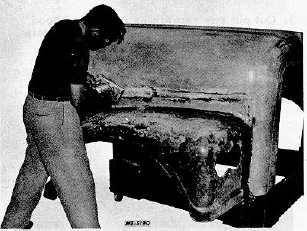
14.
Grind or sand all outside hood and fender joined
laminated seams. See Fig. 12
Fig. 12 Service Fender and Hood Refinishing.
15.
With plastic putty fill any existing low spots or surface
cracks with plastic putty. 16. Sand the entire exterior
smooth, using a #400 grit paper. See Fig. 12. Clean
surface with acetone or lacquer thinner. Apply prime
coat and follow with standard automotive refinishing
procedures. See Fig. 13.
CTS-2408 Page 6
PRINTED IN UNITED STATES OF AMERICA
|