|
| |
TM5-4210-229-14&P
6-18.
TRANSFER CASE REPAIR (Continued).
h.
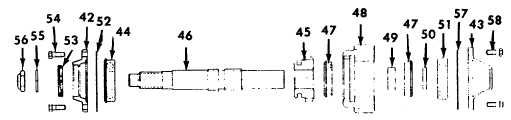
Front output shaft removal.
(1) Remove the seal carrier (42) from the front of the
case and the cap (43) from the rear of the case.
Drive the shaft from the rear of the case until the
front bearing (44) is clear of the housing. Use a
bearing puller between the bearing and the case
to remove the bearing from the shaft. The shaft
and gear assembly can now be removed.
(2) Remove the shaft from the gear in an
arbor press.
REPAIR
a.
Parts cleaning.
Cleaning solvent (Appendix D, Item 54) is
both toxic and flammable. Keep off skin. Use
only in a well ventilated are and avoid
prolonged breathing of vapors. Keep away
from open flames.
(1) Clean all components with solvent (Appendix D,
Item 54).
Compressed air used for cleaning or drying
can create airborne particles that may enter
the eyes. Pressure shall not exceed 30 psi
(206 kPa). Wearing of goggles is required to
avoid injury to personnel.
(2) Dry all parts after cleaning with a clean, soft shop
towel (Appendix D, Item 55). Compressed air
can be used to dry in accessible areas of large
parts. Compressed air should not be used to spin
dry bearings. Spin dry-ing bearings may cause
damage to the mat-ing surfaces due to lack of
lubrication.
(3) To prevent corrosion damage, dried parts
should be immediately coated with a light oil
(Appendix D, Item 37).
b.
Inspection.
(1) Carefully inspect all parts being reused for signs
of wear or damage. Examine all bearing
surfaces, ball bearing assemblies and roller
bearing cups and cones for wear, pitting or
overheating. Examine gears for pitting, scoring
and broken teeth. Shafts should be examined
for nicks, mars, and damaged threads. Check
all shift forks and slots in sliding clutches for
extreme wear or discoloration from heat. Also
check the teeth engagement of the sliding
clutches
for
partial
engagement
pattern.
Discrepant parts or any part showing signs of
wear or damages should be repaired or replaced.
ASSEMBLY
NOTE
All parts must be clean and all gasket surfaces
must be free of old gasket material.
In order to reduce chances of galling or
scoring and to provide initial lubrication for
the oil seals, lubricate housing bores, shaft
splines and-bearing mounting surfaces, and
sealing lips on oil seals with Lubriplate
(Appendix D, Item 34)or equal.
When installing bearings, use flanged end
bearing drivers that will apply equal force to
both inner and outer races of the bearings. If
tubular or sleeve type drivers are used,
apply the force to either the inner or outer
race or both races as needed to put the
bearing in place without pushing through the
bearing balls.
6-98
|