|
| |
TM5-4210-229-14&P
4-76. FUEL INJECTION PUMP REPLACEMENT (Continued).
k.
Install fuel supply, fuel return and high pressure
injection lines with all clamps and brackets. Clean
inside of each injection line with filtered air before
assembling to injection pump and nozzles. Torque
line nuts to 30 ft-lb (41 N.m).
l.
Remove all protective caps and install and connect
all other applicable lines, hoses and wires to the
pump.
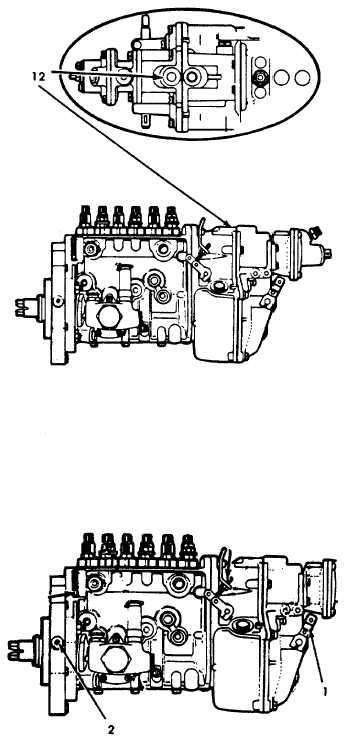
m. Add minimum of one pint of engine oil to governor
through the upper governor housing plug (12). Be-
cause injection plug is splash lubricated, engine oil
must be added to a replacement pump.
n.
Install throttle cable or linkage to outer control
lever (1). Adjust throttle cable or linkage so tang in
outer control lever is in override position. At over-
ride lever tang will be approximately half way from
center of control lever to end of slot.
o.
After installation of fuel injection pump, prime fuel
system using these procedures.
(1) Loosen all six high pressure fuel lines at nozzle
end.
(2) Loosen hand priming pump handle.
(3) Operate priming pump until pump action be-
comes solid (harder to pump).
(4) Position injection pump shutoff lever in run
position with electric shutoff or mechanical ca-
ble.
(5) Crank engine for fifteen seconds.
(6) Operate priming pump until pump action be-
comes solid. Tighten priming pump handle se-
curely.
(7) Crank engine for fifteen seconds and observe
fuel/air leakage at each nozzle/fuel pipe con-
nector. When fuel flows from each nozzle con-
nector, tighten connector.
(8) Start engine and operate until engine runs
smoothly.
4-90
|