|
| |
TM 5-4210-220-12
4-12. CAB - Continued
NOTE
If adjustment of ferrule (12) is not enough to properly aline cable sheathing clamp point with
bracket (13), bracket location may be adjusted. To do this, loosen nuts (14) and slide bracket (13)
to new position. Be sure to tighten nuts firmly after adjustment.
(4)
Install lamp socket (6) in shift control.
(5)
Check that adjustment of transmission shift cable is accurate. Refer to steps 13 and 14 of Transmission
Cable Repair following.
(6)
Install instrument panel to dashboard frame using screws (1) Tighten screws firmly.
REPAIR
a.
Transmission Cable Repair
(1) Remove
instrument
panel
containing
transmission shift control as detailed in
REMOVAL preceding.
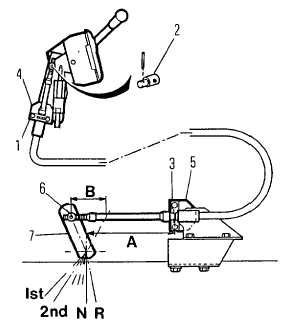
(2) Remove c able clamp (1) attaching cable
sheathing to shift control bracket (4).
(3) Remove cotter pin and swivel fitting (2)
attaching
cable
end
to
shift
control.
Unscrew swivel fitting from cable end.
(4)
Remove cable clamp (3) attaching cable
sheathing to transmission bracket (5).
(5) Remove cotter pin and swivel fitting (6)
attaching cable end to transmission shift
arm (7). Unscrew fitting from cable end.
(6)
Remove transmission shift cable from truck and route new cable in place.
(7)
Screw cable end into swivel fitting (2) until fitting is located half-way in on the threaded portion of the cable
end fitting.
(8)
Attach cable sheathing to shift control bracket (4) using clamp (1).
(9)
Screw cable end into swivel fitting (6) and attach cable to bracket (5) in the same manner as detailed in
steps (7 and 8).
(10)
Be sure that the shift control is placed in NEUTRAL and the transmission selected in neutral before
proceeding with the cable installation. The illustration shows Reverse, Neutral and the forward gears.
Move shift over by hand, if necessary, to locate NEUTRAL position.
4-97
|