|
| |
TM 750-116
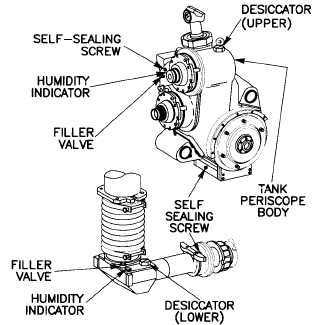
q. Periscope, M901 (fig 3-35).
NOTE
Desiccant must be replaced every time unit is
purged. Do not check pressure at any time oth-
er than during the pressurizing cycle. Loss of
pressure resulting from such attempts will
shorten the time between maintenance actions.
Refer to appendix A for listing of applicable
publications.
(1) Upper Section.
Pressurizing in excess of 10 psig (68.95 kPa)
can cause damage to seals.
(a) Remove desiccator by unscrewing container part
(hex head) from tank periscope body.
(b) Hold container part upright and remove slotted
cap of desiccator by turning counterclockwise using screw-
driver and discard old desiccant.
To prevent damage to tank periscope, purge
charging lines by blowing pressurized nitro-
gen through lines. This will remove any con-
tamination in lines.
(c) Close pressure regulator valve (CCW). Open
nitrogen tank valve and observe nitrogen tank pressure
gauge, indicating tank is pressurized.
(d) Remove dust cap on filler valve. Install hose
assembly and loosen self-sealing screws in both upper and
lower sections.
(e) Open pressure regulator valve (CW) to purge
pressure of 4-5 psig (27.5 to 34.4 kPa) on low pressure
gage. Check that nitrogen is being discharged from self-
sealing screw holes.
(f) Alternately open and close self-sealing screw
holes so one hole is open and another is closed every 15
minutes.
(g) Purge until humidity indicator is blue (approxi-
mately 30 minutes).
(h) Close pressure regulator valve (CCW).
(i) Remove desiccator from tank periscope body.
Remove slotted cap and install new desiccant.
(j) Lubricate preformed packing on desiccant cap
lightly with grease or silicone compound and install cap and
desiccator. Torque cap to 20 to 30 in lb. (2 to 3 Nm).
(k) Slowly open pressure regulator valve (CW) and
pressurize upper section for 10 seconds to value given be-
low for ambient air temperatures.
(l) Close nitrogen tank supply valve (CW) and re-
move hose assembly. Install dust cap on filler valve.
Ambient Air Temperature List
Air Temp.
Pressurize to:
Above +110°F (43°C)
4.0 psig
+85°F to +110°F (25°C to 43°C)
3.0 psig
+55°F to +85°F (13°C to 29°C)
2.0 psig
+30°F to +55°F (-1°C to 13°C)
1.0 psig
+5°F to +30°F (-15°C to -l°C)
0.5 psig
Below +5°F (-15°C)
0 psig
Figure 3-35 M901/M981 Tank Periscope
(2) Lower Section.
Pressurizing assemblies in excess of 10 psig
(68.95 kPa) can cause damage to seals.
(a) Remove desiccant cap and old desiccant from
desiccant container and install desiccant cap.
(b) Close pressure regulator valve (CCW). Open
main valve on nitrogen tank and observe nitrogen tank pres-
sure gage indicating tank is pressurized.
(c) Remove dust cap on filler valve and install valve
extension and hose.
(d) Remove l/4-inch upper and lower self-sealing
screws.
(e) Open pressure regulator valve (CW) to purge
pressure of 4-5 psig (27.5 to 34.4 kPa) on low pressure
gage.. Check that nitrogen is being discharged from self-
sealing screw holes.
3-16
|