|
| |
TM 5-4210-233-14&P-1
5-74. APU PISTONS, RINGS AND CONNECTING RODS - Continued
b.
Inspection/Repair.
(1)
The cylinder wall should be free of scratches, pitting and scuffing. Check cylinder with an inside-
reading micrometer for out-of-round and wear. The bore should measure between 3.2495 in. and
3.2505 in. (82.537 to 82.563 mm) and be less than .001 in. (.025 mm) out-of-round.
(2)
If necessary, rebore the cylinder to fit the next available oversize piston. Pistons and rings are
available in .005 in., .010 in., .030 in. and .040 in. (.127 mm, .254 mm, .762 mm, and 1.016 mm)
over-size. If the cylinder does not need refinishing, remove any existing ridge from the top of the
wall with a fine stone.
(3)
Clean thoroughly and inspect the piston. Clean the carbon from the ring grooves and be sure all oil
holes are open. If the piston is badly scored or burred, loose in the cylinder, has badly worn ring
grooves or otherwise is not in good condition, replace it.
(4)
Check the clearance 90° from the axis of the piston pin and below the oil control ring. Clearance
should be .0055 in.-.0075 in. (.1397-.1905 mm). If not, replace the piston and check the cylinder
or possible reconditioning.
(5)
The piston pin should be a thumb push fit into the piston at room temperature. If the pin is
excessively loose, install a new one. If the condition is not corrected, install the next oversize pin.
If the piston is worn enough that the oversize pin will not fit, replace it.
(6)
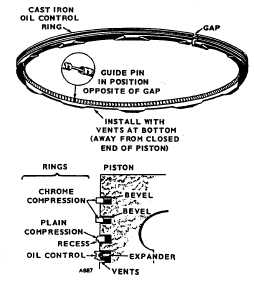
Inspect each ring carefully for fit in the piston
grooves and seating on the cylinder wall. Fit each
ring to the cylinder wall at the bottom of its travel,
using the piston to square the ring in the bore.
Check the gap with a feeler gage. It should be
.010 in. to .020 in. (.254 to .508 mm). If the gap
is too small, file the butt ends of the rings. Do not
use rings that need a lot of filing, as they will not
seat right on the cylinder wall. If an oversize piston
is used, use the correct oversize rings.
5-392
|

