 |
|||
|
|
|||
|
|
|||
| ||||||||||
|
|
 TM 5-4210-233-14&P-1
5-51. HOIST CYLINDERS
This task covers:
a. Removal
b. Installation
TOOLS REQUIRED:
EQUIPMENT CONDITION
Tool Kit, General Mechanics, Automotive
Main Engine Shutdown (see para 2-12.)
(Appendix B, Section 1II, Item 1)
APU Shutdown (see para 2-16.)
Ladder Bedded (see para 2-14.)
MATERIALS/PARTS REQUIRED
Tags, Identification (Item 32, Appendix E)
O-rings (Figure 172, Appendix F)
a. Removal.
WARNING
Escaping fluid under pressure can penetrate the
skin causing serious injury.
Relieve pressure
before unhooking hydraulic or other lines. Tighten
all connections before applying pressure. Keep
hands and body away from pin- holes and nozzles
which eject fluids under high pressure. Use a piece
of cardboard to search for leaks.
If ANY fluid is injected into the skin, it must be
surgically removed within a few hours by a doctor
familiar with this type injury or gangrene may result.
(1) Relieve pressure from hoist cylinder by:
a. Moving battery switch to position 1
or 2.
b. Turn aerial master ON.
c.
Move manual diverter valve to
AERIAL position.
d. Move RUN/LOCK lever to RUN
position.
e. Move RAISE/LOWER handle fore
and aft.
f.
Move battery switch and aerial
master switch to OFF position.
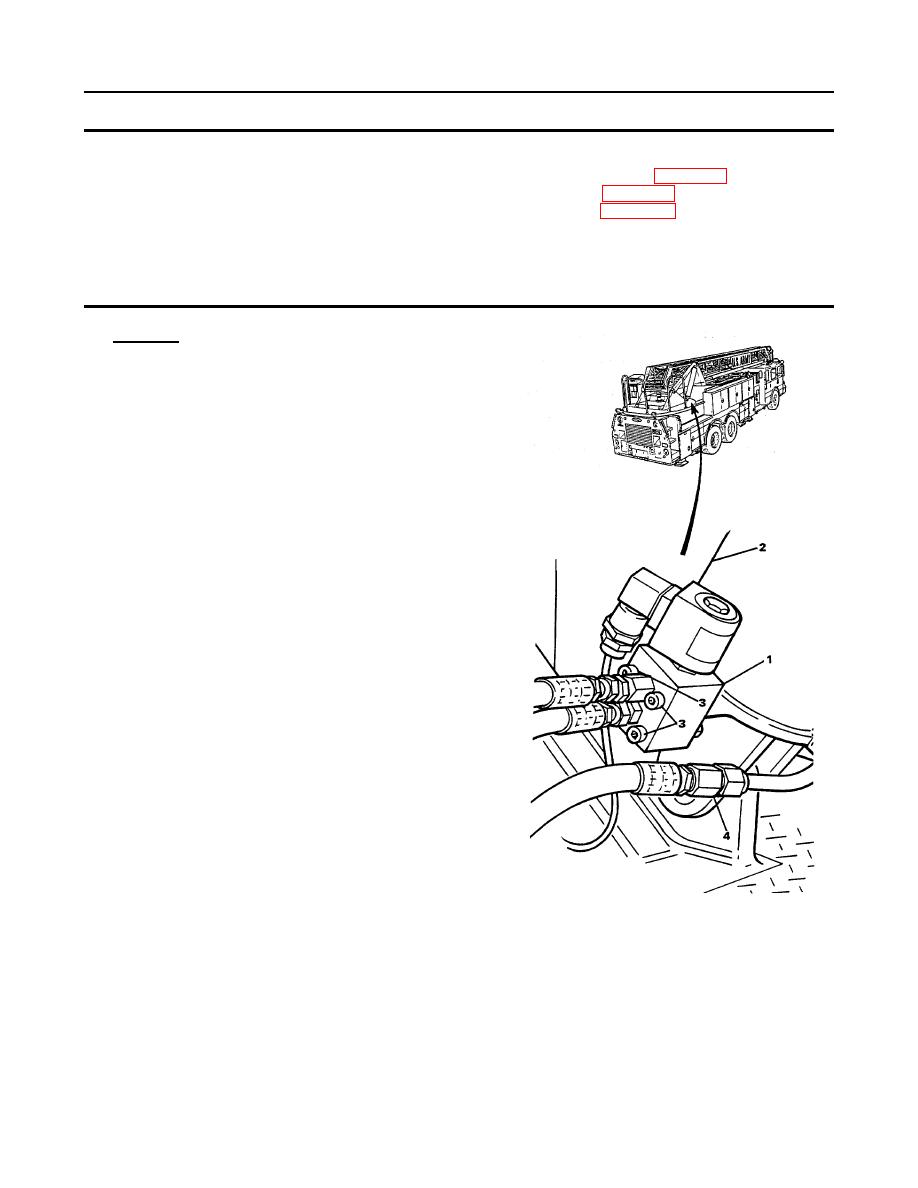
(2) Remove block (1) from hoist cylinder (2) by
removing three screws (3). Remove and
discard O-ring between block (1) and
cylinder (2).
(3) Tag and remove hose(4).
(4) Attach a suitable lifting device to cylinder.
5-335
|
|
Privacy Statement - Press Release - Copyright Information. - Contact Us |
