|
| |
TRUCK SERVICE MANUAL
TM 5-4210-230-14&P-1
DISASSEMBLY
To facilitate working on the carburetor and to prevent
damage to the throttle plates, install bolts about 2¼" long of
the correct diameter through the carburetor retaining bolt
holes with a nut above and below the flange (or install
carburetor legs).
Use a separate container for the component parts of
the various assemblies to facilitate cleaning, inspection and
assembly.
The
following
is
a
step-by-step
sequency
of
operations
for
completely
overhauling
the
carburetor;
however, certain components of the carburetor may be
serviced without disassembling the entire unit. For a
complete carburetor overhaul, follow all the steps. To partially
overhaul the carburetor or to install a new gasket kit, follow
only the applicable steps.
Fuel Bowls and Metering Blocks
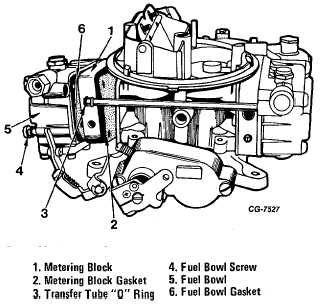
1.
Remove four spring loaded primary fuel bowl
mounting screws (Fig. 29).
2.
Remove the primary fuel bowl and gasket and the
metering block and gasket. Discard the gaskets. Also
remove fuel bowl transfer tube and "O" rings. Discard "O"
rings.
3.
Remove the fuel pump transfer tube and discard the
"O" ring seals (Late Production)
Figure 29 Removal of the Fuel Bowl and Metering Block
(Typical)
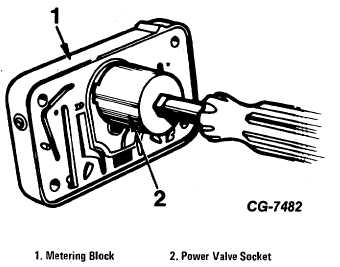
4. Using a socket wrench, SE-1772-1, remove the
power valve and gasket (Fig. 30)
Figure 30 Using Socket Wrench SE-1772-1 to Remove
Power Valve
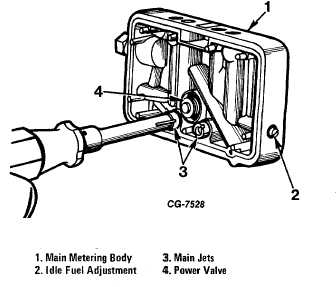
5. Using a jet wrench, SE-1772-6, remove the main
jets (Fig. 31).
Figure 31 Using Jet Wrench SE-1772-6 to Remove Main Jets
6. Remove the distributor vacuum fitting or plug from the
metering block (where used).
CGES-125-T Page 22
PRINTED IN UNITED STATES OF AMERICA
|