|
| |
TRUCK SERVICE MANUAL
TM 5-4210-230-14&P-1
BODIES AND CABS
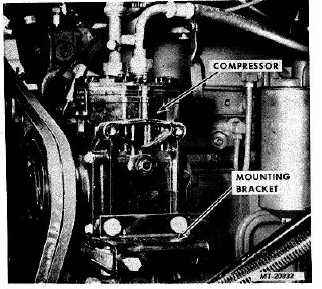
COMPRESSOR
IMPORTANT
Compressor
removal
and
installation
procedures
vary
between engine and vehicle models. General instructions are
outlined below.
Removal:
1.
Raise hood and fender assembly.
2.
Discharge air conditioning system as outlined under
SERVICE OPERATIONS.
3.
Remove drive belt(s).
4.
Disconnect magnetic clutch feed wire from engine
wiring harness.
5.
Disconnect inlet and outlet hoses from compressor.
Cap or tape compressor and hose openings to
prevent entry of foreign material.
6.
Remove bolts securing compressor to mounting
bracket(s).
7.
Remove compressor from mounting bracket.
IMPORTANT
For compressor service instructions, refer to Body and Cabs,
Section CTS2577 of the Truck Service Manual.
Installation:
1.
Check oil level in compressor as outlined under
SERVICE OPERATIONS.
2.
Position compressor on mounting bracket(s) and
install mounting bolts. (Do not tighten mounting
bolts.)
3.
Install drive belt(s).
4.
Check drive belt alignment and tighten compressor
mounting bolts.
5.
Adjust
drive
belt(s)
to
specified
tension
(see
SPECIFICATIONS).
6.
Lubricate fittings with refrigerant oil and connect inlet
and outlet hoses to compressor.
7.
Connect magnetic clutch feed wire to engine wiring
harness.
8.
Evacuate and charge air conditioning system as
outlined under SERVICE OPERATIONS.
9.
Lower hood and fender assembly.
Fig. 41 Compressor Mounting (Typical)
COMPRESSOR MAGNETIC CLUTCH
On most applications the magnetic clutch can be
removed for service without discharging the system or
removing the compressor from the engine.
Removal:
1.
Make sure key switch and A/C lever are "OFF".
2.
Disconnect clutch feed wire from engine wiring
harness.
3.
Loosen compressor drive belt tension and remove
belt(s) from clutch pulley.
Inspect drive belt(s) and replace if worn or damaged.
4.
Using spanner wrench (SE-2392-4) to hold clutch
hub, remove clutch retainer bolt (Fig. 42).
5.
Thread 5/8-11 remover bolt (SE-2392-5) into clutch
drive hub. Tighten remover bolt against end of
compressor crankshaft to loosen clutch. Remove
clutch assembly and drive key from crankshaft.
6.
Remove mounting bolts and remove field coil
assembly (or stationary brush assembly) from
compressor body.
CTS-2731 Page 27
PRINTED IN UNITED STATES OF AMERICA
|