|
| |
TM5-4210-229-14&P
6-16.
REAR RETAINER OIL SEAL REPLACEMENT.
This task covers:
a. Removal
b, Installation
INITIAL SET-UP
Tools
General Mechanics Tool Kit
Equipment Condition
Para.
Condition Description
Materials/Parts
6-13
Flywheel Removed
Rear Seal Kit (691631C91)
Oil (Appendix D, Item 37)
Grease (Appendix D, Item 21)
RTV Sealant (Appendix D, Item 45)
REMOVAL
a.
Using a chisel, split the oil seal.
Be careful not to damage the seal bore in the
housing.
b.
Remove the seal from the flywheel housing.
c.
Cut the wear sleeve with a muffler chisel. Be
careful not to damage the crankshaft flange.
d.
Remove the wear sleeve.
INSTALLATION
Care should be taken not to damage the bore
while filing the chamfer edge.
a.
Inspect the oil seal bore for a chamfer. If no
chamfer is found, use a file to break the edge of
the bore. This will prevent possible damage to
the oil seal casing during installation.
b.
Prior to wear sleeve and oil seal installation,
clean the bore and crankshaft of all foreign
material.
c.
If the oil seal and wear sleeve are not utilized
(reassembled), assemble seal to sleeve prior to
installing onto crankshaft.
(1) Clean and lubricate single lip seal with clean oil
(Appendix
D,
Item
37).
(2) Fill double lip seal with grease (Appendix D,
Item 21) at cavity between lips.
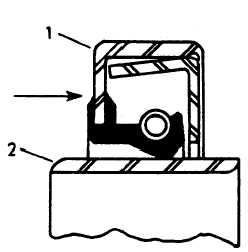
Seal (1) must be installed onto side of sleeve
with chamfer in O. D. (2) to avoid damage to
seal lip.
(3)
Assemble seal (1) onto sleeve by pushing the
seal in the direction of the arrow.
NOTE
Seal bore in housing must be concentric with
crankshaft within 0.010 inch (0.25 mm) full
indictor measure as shaft is rotated 360°.
6-93
|

