|
| |
TM5-4210-229-14&P
6-15.
TRANSMISSION REPAIR (Continued).
m. Remove snapring (33). Remove six second clutch
plates (34) and clutch backplate.
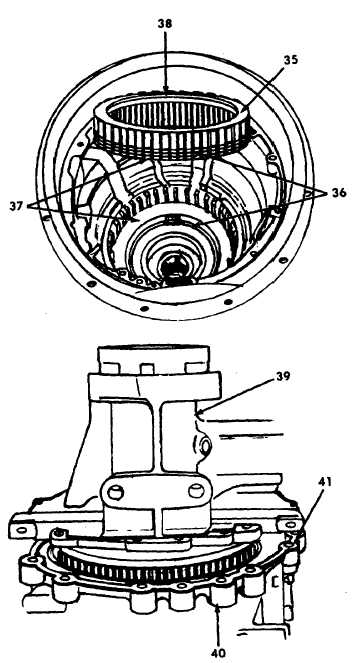
n. Remove snapring that retains first clutch backplate
(35). Remove ten first clutch plates (36) and (37),
ring gear (38) and backplate (36) as an assembly.
Remove the remaining two first clutch plates (37).
o. Invert the transmission. Remove fourteen bolts and
washers that retain the rear cover (39) to the
transmission housing (40). Carefully remove the
rear cover assembly and the attached parts.
Remove the rear cover gasket (41).
REPAIR
a. Torque converter repair.
NOTE
Before
disassembling
the
converter
assembly, it is necessary to check the
amount of converter end play.
(1) End play check.
(a) Support the converter assembly on the
converter cover (pump hub upward). Place
converter
end
play
gauge
into
the
converter pump hub.
(b) Hold the center screw of the gauge and
tighten the nut until the gauge is securely
retained. Do not overtighten.
(c) Install
the
dial
indicator.
Adjust
the
indicator bracket so the stem of the
indicator is in firm contact with the top of
the center screw. Set the dial to read zero.
(d) Using both hands, lift the center screw as
far as possible. Record dial indicator
reading.
(e) End play exceeding 0.025 inch (0.64 mm)
indicates wear of converter components,
and
required
replacement
of
worn
components and the selection of a new
spacer.
(f) If end play does not exceed 0.025 inch
(0.64 mm), disassemble the converter for
inspection and cleaning. Reassemble with
the same spacer (except when major parts
must be replaced).
6-48
|