|
| |
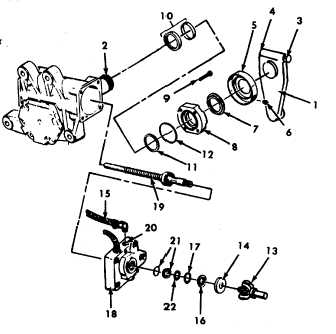
TM 5-4210-229-14&P
5-23. POWER STEERING GEAR REPAIR (Continued).
i.
Place the trunnion cover (8) on work bench to
install the new seal package.
j.
Install teflon backup washer (11).
k.
Install two piece seal (10) so that words OIL SIDE
are visible after seal is in place.
l.
Lubricate the new trunnion cover seal ring (12)
with grease (Appendix D, Item 22) and install it
into the cover groove.
m. Cover the serrations of the sector shaft (2) with
tape to avoid damaging the seals during
reassembly.
NOTE
Use only one layer of tape.
n.
Install the trunnion cover (8) and four bolts (9).
Torque bolts (9) to 15-22 ft-lb (20-30 N.m) dry
using 1/2 inch socket.
o.
Pack high temperature grease (Appendix D, Item
22) around seal area of sector shaft (2).
p.
Install seal (7) using seal driver.
q.
Apply generous amount of grease (Appendix D,
Item 22) to protector boot (5) in the area inside of
the smaller diameter ring.
r.
Assemble protector boot onto shaft (2) and
trunnion cover (8) locating the grease fitting hole
toward the input shaft end of the gear assembly.
s.
Insert grease fitting (6) into protector boot (5).
t.
Remove tape from sector shaft serrations.
u.
Reconnect the pitman arm (1) making sure
alignment marks are in proper positions.
v.
Install bolt (4) and nut (3) using a 3/4-16 grade 8
bolt. Torque to 380-420 ft-lb (515-569 N.m) dry.
w. Fill the steering system reservoir with power
steering fluid (Appendix D, Item 19).
x.
Crank the engine for 10 seconds without allow-
ing it to start. Check and refill the reservoir.
Repeat at least 3 times, each time checking and
refilling the reservoir.
y.
Start the engine and let it idle for 2 minutes.
Shut the engine off and check the fluid level in
the reservoir.
z.
Start the engine again. Steer the vehicle from
full left to full right, turning several times. Add
fluid as necessary to the fill line on the dip-
stick.
5-56
|