|
| |
TM5-4210-229-14&P
4-182. PITMAN SHAFT SEALREPLACEMENT.
This task covers:
a. Removal
b. Installation
INITIAL SETUP
Tools
General Mechanics Tool Kit
Drift
Materials/Parts
Power Steering Fluid (Appendix D, Item 19)
Seal Kit (As Required, Appendix E, Figure E-136)
Crocus Cloth (Appendix D, Item 12)
Solvent (Appendix D, Item 54)
Grease (Appendix D, Item 22)
Equipment Condition
Para. Condition Description
4-176 Pitman Arm Removed
General Safety Instructions
Engine OFF.
Transmission in (N) neutral.
Parking brake set.
REMOVAL
a.
Position a drain pan under the steering gear.
b.
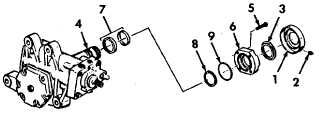
Remove protector boot (1), grease fitting (2) and
dirt and water seal (3). Discard protector boot and
dirt and water seal.
c.
Clean the sector shaft (4) with a crocus cloth
(Appendix D, Item 12). Be sure to remove any
paint.
d.
Remove the four trunnion cover bolts (5) and
trunnion cover (6). Then remove and discard the
sector shaft seal package consisting of the
two-piece sector shaft seal (7), the Teflon back-up
washer (8) and the trunnion cover seal ring
(9).
Cleaning solvent (Appendix D, Item 54) is both toxic
and flammable. Keep off skin. Use only in a
well-ventilated area and avoid prolonged breathing of
vapors. Keep away from open flames.
e.
Clean the trunnion cover (6) with solvent
(Appendix D, Item 54) and inspect the seal cavity
and sealing face for nicks or corrosion. Replace the
trunnion cover (6) with a new one if these
conditions exist.
INSTALLATION
a.
Place the trunnion cover (6) on a bench to install
the new seal package. Start with the Teflon backup washer
(8).
The words OIL SIDE must be visible on the seal after it
is in place. The seal will not function if the seal is
reversed and a loss of power steering assist may
occur.
b.
Install the two-piece sector shaft seal (7) so that the
words OIL SIDE are visible after seal is in place.
c.
Grease the new trunnion cover seal ring (9) and
install it into the cover groove.
d.
Cover the serrations of the sector shaft (4) with only
one layer of tape to avoid damaging the seals
during installation.
e.
Install the trunnion cover (6) and four trunnion bolts
(5). Torque bolts to 15-22 ft-lb (20- 30 N.m) if dry or
11-16 ft-lb (15-22 N.m) if lubricated.
f.
Pack clean high temperature grease (Appendix D,
Item 22) around seal area of sector shaft (4). Install
a new dirt and water seal (3) using a suitable blunt
end drift.
g.
Apply a generous amount of the same grease
(Appendix D, Item 22) to the protector boot (1) in the
area inside of the small diameter ring. Assemble
protector boot onto sector shaft (4) and trunnion
cover (6) locating the grease fitting hole toward the
input shaft end of gear assembly. Insert grease
fitting (2) into protector boot. Remove tape from
sector shaft serrations.
h.
Install the pitman arm (paragraph 4-176).
i.
Fill the steering fluid system (Appendix D, Item 19)
(paragraph 4-180) and bleed system as needed.
4-197
|