|
| |
TM 5-4210-220-34
2-12.
PUMP DRIVE AND PTO - Continued
2-12.4
Reducer Gearbox.
This task covers
a. Repair
b. Overhaul
TOOLS
MATERIALS/PARTS
Shop Equipment, Automotive
10, Appendix B Dry Cleaning Solvent
Maintenance and Repair,
13, Appendix B Emery Cloth
NSN 4910-00-754-0705
22, Appendix B Pipe Sealant
29, Appendix B Threadlock Liquid
EQUIPMENT CONDITION
02-23-01262-200 Repair Kit
Reducer Gearbox Removed
(see TM 5-4210-220-12)
NOTE
Keep work area as clean as possible to prevent contamination of components.
REPAIR
NOTE
Reducer gearbox repair consists of replacement of leaking seals and gaskets and shaft end play adjustment.
There are two types of caps on the gearbox, an open cap through which shaft protrudes and a closed cap.
If an open cap is removed it is recommended that the oil seal be replaced.
(1)
Measure shaft end play prior to the removal of cap
and record these readings. If end plate exceeds
.005 in. (0.127 mm) this indicates bearing wear.
(2)
If unit is full of oil, drain it into a clean drain pan.
Install drain plug and tighten.
(3)
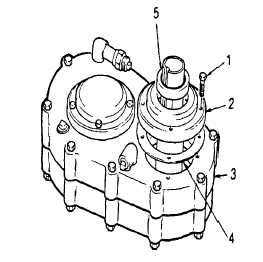
Remove four capscrews (1) that retain the cap (2) to
the housing (3).
(4)
Remove cap (2) from housing (3). The cap may be
loosened from the housing, by lightly tapping on the
corner of the cap. Never pry caps off because
damage may result.
(5)
Inspect bearing cone and caps for damage as
described in para. 2-7. If damage is evident refer to
OVERHAUL following. If there is no bearing
damage proceed to step 6.
(6)
Remove cap gaskets (4) using a putty knife. If
possible count and record the number of gaskets
removed.
2-86
|

