|
| |
TM 5-4210-220-34
2-11.
HOSE BODY - Continued
2-11.1
Hose Body Assembly - Continued
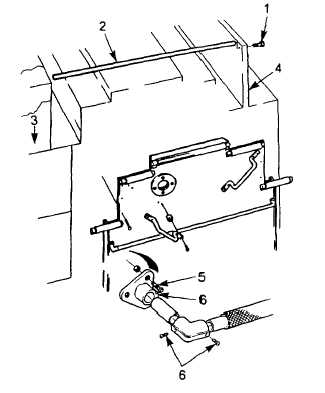
(3) Inspect compartment box rear and upper
panel for oversized or cracked grab rail
mounting holes. Replace panels or use
oversized washers, or rivet a reinforcing
patch to the panel as required.
(4) Examine grab rail (2) for dents, bends, or
stripped threaded holes. Grab rail length
should be 65.6 in. (166.7 cm).
(5) If grab rail is bent, straighten in a press. If
threaded holes are stripped, drill and tap to
next highest size. Replace grab rail if
damage is excessive.
(6) To install grab rail (2), lift into position
between the compartment box (3) and
upper panel (4). Secure grab rail using
capscrews (1). Tighten capscrews to 17 ft
lb (23 Nm).
(7) To remove lower grab rail, support rail and
remove screws (5) from one side. Remove
set screw (6) and slide off bracket.
Remove
rail
from
other
bracket
by
removing set screws (6).
(8) Remove second bracket if required.
(9) Inspect rail and covering. Covering is a cut
length of pressure hose. Remove old cover
and replace as required. Glue to pipe using
sealant (item 25, Appendix B).
(10) Install one bracket. Push rail into position
and slide second bracket into position on
other end of rail.
(11) Secure second bracket with screws (5).
Tighten all screws securely.
(12) Tighten set screws (6) securely.
2-50
|