|
| |
3-8.
ENGINE Continued
(18) Slide each fuel rod cover tube hose down
on the cover tubes attached to the cylinder
heads and tighten the hose clamps.
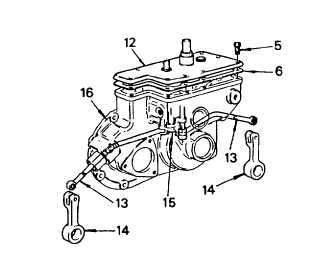
(19) Insert the end of the left-bank fuel rod (13)
through the hole in the cylinder head and up
through the fuel rod cover tube to the
control link operating lever (15).
(20) Raise
the
connecting
pin
up
in
the
connecting link lever (15). Insert the end of
the fuel rod (13) between the two bosses on
the lever and insert the connecting pin
through the fuel rod and into the lower
boss.
(21) Connect the opposite end of the fuel rod to
the injector control tube lever (14) with a
clevis pin and cotter pin.
(22) Insert the end of the right-bank fuel rod (13) through the hole in the cylinder head and up through the fuel rod
cover tube to the control link operating lever (15).
(23) Remove the short screw pin from the control link operating lever (15). Insert the end of the fuel rod between
the two bosses on the lever and install the screw pin. Tighten the pin securely.
(24) Connect the opposite end of the fuel rod to the injector control tube lever (14) with a clevis pin and cotter pin.
(25) Affix a new gasket (6) to the top of the governor housing (16). Place the governor cover (12) on the governor
housing with the pin in the speed control shaft assembly in the slot in the differential lever and the dowel pins
in the housing in the dowel pin holes in the cover. Install the eight cover attaching screws (5). Tighten the
screws securely.
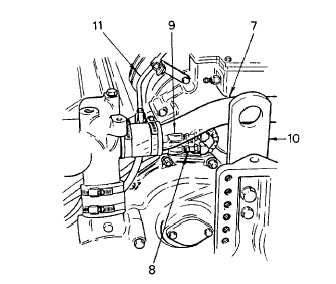
(26) Install and connect the crossover fuel line
(11) to each cylinder head and connect the
fuel lines (8 and 9) to the fuel pump.
(27) If removed, install the front engine lifter
bracket (10). Replace fan and fan clutch as
detailed in TM 5-4210-220-12.
(28) Place the water bypass tube (7) between
the two thermostat housings and slide the
hose on the thermostat housings. Position
the bypass tube so it clears the governor,
fuel pump, and fuel lines. Then tighten the
hose clamps.
(29) Install the turbocharger and attaching parts
as detailed in para. 3-8.2.
3-109
|


