|
| |
TM 5-4210-220-34
3-7.
TRANSMISSION-Continued
(5)
Attach a hoist to the lifting bracket, fastened to output shaft. Carefully separate the rear cover from the
adapter housing. Remove the rear cover gasket and discard.
(6)
Properly block rear housing on clean workbench area with output end upwards.
(7)
Using tools J24171-1, 2, 4, remove dust shield (31) and output shaft oil seal (30) from the rear cover
output end.
(8)
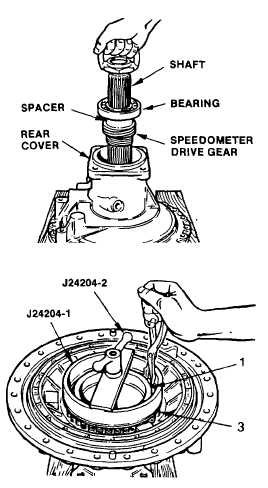
Remove speedometer drive components.
(9)
Remove the snap ring (28) that retains the rear output shaft bearing (29).
(10)
Remove the rear output shaft (12), and
its attached parts, from the rear cover.
(11)
Support the front of the speedometer
drive gear, and press the output shaft
from the gear, spacer sleeve, and
bearing.
(12)
If
orifice
plug
or
bushing
requires
replacement, remove either or both as
required.
(13)
Using compressor components J24202-
1 and J24204-2, compress the spring
retainer and springs. Remove the snap
ring (1), and remove the compressor.
(14)
Remove the spring retainer (2) and 30
springs (3).
(15)
Remove the clutch piston (4). Remove the inner (6) and outer (5) seal rings from the piston.
(16)
If the speedometer driven gear bushing (15) requires replacement, remove it. Thread remover J24205-2
into the bushing. Attach slide hammer J6125-1 to remover J24205-2 and remove the bushing.
(17)
Remove any remaining parts that require replacement, from the rear cover.
3-61
|