|
| |
TM 5-4210-220-34
3-7.
TRANSMISSION - Continued
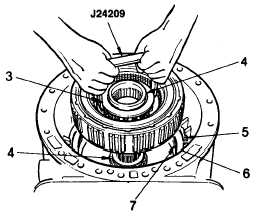
NOTE
Keep both front and rear bearing races
(4) with the clutch assembly during
rebuild.
(4) Remove the snap ring (5) that retains the
third-clutch backplate (6). Remove the
backplate.
(5) Remove eight third-clutch plates (7).
NOTE
Tie the third-clutch plates together, and
identify the pack. Retain for inspection,
t.
Forward Clutch And Turbine Shaft Overhaul
(1)
Remove hook-type seal ring (1) from the front of the turbine shaft.
(2)
Remove bearing race (2) from the hub of forward clutch housing assembly (4).
(3)
Remove two hook-type seal rings (3) from the turbine shaft.
(4)
Position forward clutch assembly on work table, turbine shaft down.
(5)
Remove bearing race (6) and bearing (7) from forward clutch hub (8).
(6)
Remove snap ring (9) and fourth clutch driving hub (10).
(7)
Remove five each of clutch plates (11 and 12).
(8)
Remove forward clutch hub (8).
(9)
Remove bearing race (13) and needle bearing (14) from the inner hub of the forward clutch hub (8).
(10) Remove bearing race (15) from the inner hub of the forward clutch housing (16).
(11) Using spring compressor J24204-3, compress the spring retainer (17), and remove the snap ring (18).
(12) Carefully remove pressure from the spring retainer and remove the spring retainer.
(13) Remove 20 piston return springs (19).
(14) Remove forward clutch piston (20) and seal rings (21 and 22).
(15) If the piston is replaced, be sure the identification letter (A, B or C) for the new piston is identical to that of the
piston replaced.
(16) Do not remove the PTO gear (23) unless replacement is necessary.
3-38
|