|
| |
TM 5-4210-220-34
2-21.
FRONT AXLE - Continued
WARNING
Death or serious injury could occur if compressed air is directed against the skin. Do not use compressed
air for cleaning or drying unless the pressure is/has been reduced to 30 psi (2.11 kg/cm2) or less. When
working with compressed air, always use chip guards eye protection and other personal protective
equipment.
(1)
Clean all components with dry cleaning solvent (item 10, Appendix B) blow dry using compressed air.
(2)
Inspect ball for deep grooves or scratches. Check clearance between ball bushing and journal area (on axle
shaft) that contacts bushing. If clearance exceeds 0.015 in. (0.38 mm), replace ball and bushing assembly.
(3)
Inspect kingpins for wear. Replace if pins show signs of heavy or excessive wear.
(4)
Inspect kingpin bearings as detailed in para. 2-7. Replace cone and cup as required.
INSTALLATION
(1)
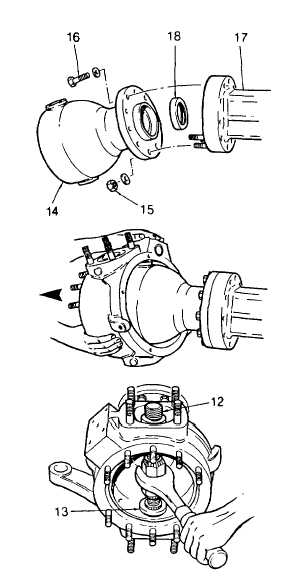
Install new oil seal (18). Be sure seal is
positioned so its open side faces axle
housing when axle ball is installed on axle.
Push seal in place using a suitable arbor.
(2)
Place axle ball on axle housing studs and
install
nuts
(15),
lockwashers,
and
capscrews (16). Tighten nuts to 360 ft lb
(490 Nm) and tighten capscrews to 220 ft lb
(300 Nm).
(3)
Tip ball socket and install it on axle ball as
shown. Position socket on ball to maintain
correct
relationship
between
top
and
bottom of the ball and socket.
(4)
Install kingpins (12 and 13) using spreading
fixture to seat the pins as shown. Be sure
fixture is tightened sufficiently to keep pins
in
place.
2-283
|

