|
| |
TM 5-4210-220-34
2-19.
ENGINE - Continued
The fuel spray from an injector can penetrate the skin. Fuel which enters the blood stream can cause a
serious infection. Follow instructions carefully and use proper equipment to test an Injector. All tests must be
performed using injector test oil J26400. To fully test an injector, all the following tests should be carried out.
a.
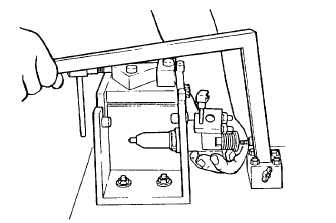
Injector Control Rack And Plunger Test
(1)
Place Injector in holding fixture J22396
as shown.
(2)
Place
handle
on
top
of
injector
follower. Adjust contact screw in
handle so it rests at center of follower,
when
the
follower
spring
is
compressed.
(3)
Push up control rack on the injector to
the no-fuel position. Push handle
down to depress follower fully.
(4)
Release pressure on handle slowly,
while moving control rack up and
down. The control rack should fall
each
time
under
gravity.
(5)
If the control rack is stiff, loosen the injector nut, turn the tip and retighten. Repeat until rack is free. If
the rack isn’t free change the Injector nut as detailed in REPAIR following.
b.
Visual Inspection Of Plunger
NOTE
This test need not be carried out if a reassembled injector is being tested.
(1)
Support the injector, follower end up, in holding fixture J22396.
(2)
Compress the follower spring by hand. Raise spring above the stop pin with a screwdriver and withdraw
the pin. Allow the spring to rise gradually.
(3)
Remove injector from holding fixture. Turn upside down and catch the spring, follower and plunger as
they drop out.
(4)
Inspect the plunger. If the plunger is chipped, worn, or scratched especially in the helix area, replace the
plunger and bushing.
(5)
Reinstall the plunger, follower, and spring.
c.
Injector Operation Tests
(1)
Install injector in tester J23010 or similar model. Ensure correct clamping head is used. Follow tool
instructions with extreme care to ensure mounting is correct.
2-183
|