|
| |
TM 5-4210-220-34
2-19.
ENGINE - Continued
2-19.2
Accessory Drive - Continued
d.
Rear
Accessory
Drive
Assembly(direct-drive)
Installation
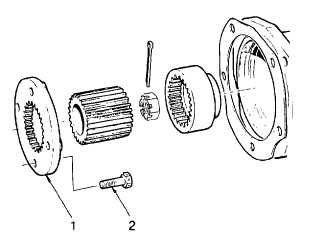
(1) Aline the bolt holes in the accessory drive plate
(1) with the tapped holes In the camshaft gear.
(2)
Secure the drive plate with the four special
shoulder bolts (2). Tighten the bolts to 45 ft lb
(61 Nm).
(3)
Install the air compressor as detailed in TM 5-
4210-220-12.
REPAIR
a.
Steering Pump Drive Repair
NOTE
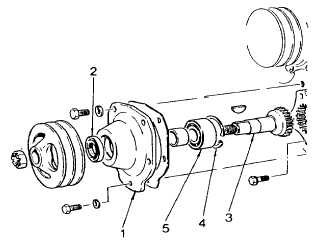
Drive unit removed from engine.
(1)
Using a press, push drive shaft (3) out of retainer (1)
(2)
Remove snap ring (4) and pull bearing (5) out of retainer.
(3)
Pull oil seal (2) out of retainer Discard oil seal.
(4)
Place the accessory drive retainer on a bench,
with the mounting flange side up. Lubricate
the outside diameter of the bearing (5) with oil
(item 17, Appendix B). Press or tap It (with the
protruding face of the inner race facing toward
the retainer) straight in until It contacts the
shoulder in the retainer. Then install the snap
ring (4).
(5)
Turn the retainer over and coat the oil seal
recess with silicone sealant (item 28, Appendix
B). Press a new oil seal into the bore of the
retainer with the lip of the seal facing the
bearing. Wipe any excess sealant from the
retainer.
(6)
Turn the retainer over again, bearing side up. Lubricate the drive shaft and press it in the bearing until
the shoulder on the shaft contacts the bearing.
(7)
Install the drive unit as detailed in INSTALLATION preceding.
2-170
|