|
| |
TM 5-4210-220-34
2-19.
ENGINE - Continued
2-19.2
Accessory Drive.
This task covers
a.
Removal
b.
Inspection
c.
Installation
d.
Repair
TOOLS
Batteries Disconnected (see TM 5-4210-220-12)
Shop Equipment, Automotive
Both Engine Compartment Covers Removed
Maintenance and Repair,
(see TM 5-4210-220-12)
NSN 4910-00-754-0705
J33001 Alinement Tool
MATERIALS/PARTS
5131329 Steering Pump Drive Gasket
EQUIPMENT CONDITION
5104507 Alternator Gasket
Main Engine Shutdown (see TM 5-4210-220-12)
APU Shutdown (see TM 5-4210-220-12)
NOTE
A single accessory drive is installed on the front left-hand side of the engine. Three accessory drives are
installed on the rear of the engine; two are pulley drives and one is direct drive. Repair of the accessory
drive consists of replacing components of the drive which have failed. Dismantle drive system only as far
as required to remove the failed component.
REMOVAL
a.
Front Accessory Drive Removal
NOTE
This accessory drive pulley is not utilized on this truck. The front accessory drive is camshaft mounted
(refer to General Support for removal).
b.
Steering Pump Drive Removal
(1)
Remove steering pump and associated mounting brackets (see TM 5-4210-220-12).
(2)
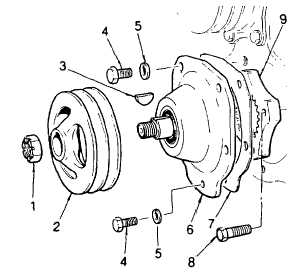
Remove pulley nut (1).
(3)
Remove pulley (2) using a puller.
(Pulley has threaded holes to attach
puller.)
(4)
Remove pulley key (3).
(5)
Remove bolts (4) and lockwashers (5).
Lift off retainer (6). Remove and
discard gasket (7).
(6)
Place a clean lintless cloth in the
housing opening (under the accessory
drive plate or drive hub) to prevent
bolts from accidentally falling into the
gear train. Then remove the four
shoulder bolts (8) and withdraw the
accessory drive plate
(9).
2-166
|