|
| |
TM 5-4210-220-34
12-15.
WATER TANK ASSEMBLY - Continued
(8) Install air line fitting (4) to tank nipple and tighten firmly.
(9) Apply pipe sealant (Item 22, Appendix B) to thread of nipple (3). Install nipple, swivel adaptor (2), and cap
(1).
REPAIR
a.
Valve Seal and Diaphragm Repair
NOTE
Valve may be repaired while installed in tank.
(1)
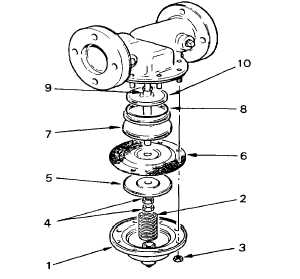
Remove nuts (3), valve cover (1) and spring (2).
(2)
Carefully remove diaphragm and stem assembly.
(3)
Hold valve stem (9) and remove nuts (4) attaching
diaphragm washer (5), diaphragm (6), O-ring
retainer (7), O-ring (8), and O-ring washer (10).
Separate all items.
(4)
Inspect individual parts; if any components other
than O-ring (8) and diaphragm (6) show signs of
extensive wear or damage, the complete valve must be replaced, see REPLACEMENT preceding.
(5) Replace items (6 and 8) and assemble valve stem (9), O-ring washer (10), O-ring (8), O-ring retainer (7),
diaphragm (6), and diaphragm washer (5) in this order. Install and tighten nuts (4).
(6) Install valve stem and diaphragm assembly to valve body, and install spring (2) and cover (1).
(7) Install nuts (3) and tighten in a diametrical pattern. Be sure nuts are tightened firmly and uniformly.
2-147 ( 2-148 Blank)
|

