|
| |
TM 5-4210-220-12
4-30. REAR AXLE - Continued
(8) Soak new felt oilers (14) in Dexron (item 9,
Appendix E) and lubricate O-rings (18) and
(9) with petroleum jelly (item 21, Appendix
E).
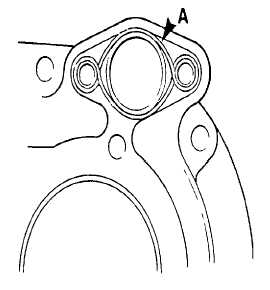
(9) Apply a 1/8 in. (6.5 mm) bead of silicone
sealant (A) (item 28, Appendix E) to
mounting flange of power divider housing
as shown.
(10)
Install new shift unit body (13) to power
divider housing using capscrews (11 ) and
lockwashers (12) Tighten capscrews to 50 ft
lb (70 Nm).
(11)
Place spring (17) over push rod (10) and
insert piston stop (15) in body (13).
(12)
Install felt oilers (14) and O-ring (18) on
piston (16).
(13) Install piston in shift unit body (13) Attach piston to shift fork (10) using O-ring (9), flatwasher (8), and
nut (7). Tighten nut to 25 ft lb (35 Nm).
(14) To hold O-ring (6), apply petroleum jelly (item 21, Appendix E) to mounting surface of cover
(15) . Place O-ring on cover and install both items to body (13) using capscrews (3) and washers
(4). Be sure air inlet cover is facing upward as illustrated. Tighten capscrews (3) to 100 in. lb (11 Nm).
(15) Apply pipe sealant (item 22, Appendix E) to fitting (2) and install in cover (5) Tighten fitting firmly.
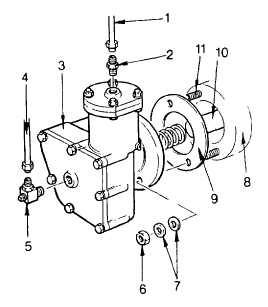
(16)
Install control air line (1) to fitting (2).
b Differential Lock Air Shift Unit Replacement
(1) Remove control air line (1) and fitting (2)
from top cover of air shift unit (3).
(2) Remove vent line (4) and tee (5) from air
shift unit.
(3) Remove nuts (6) and washers (7), and pull
air shift unit free of studs (11).
(4)
Pull spring from seal and remove seal (9)
from shift fork (10) and housing studs (11).
(5)
Inspect new air shift unit to be sure it is
undamaged and remove shipping plugs
from top and end covers.
(6)
Inspect seal and spring (9). Replace if
either part is damaged or deteriorated.
4-577
|