|
| |
TM 5-4210-220-12
4-30 REAR AXLE - Continued
4-30.5 Air Shift Units.
This task covers
a.
Replacement
b.
Repair
TOOLS
MATERIALS/PARTS
Shop Equipment, Automotive
9, Appendix E Dexron
Maintenance and Repair,
21, Appendix E Petroleum Jelly
NSN 4910-00-754-0705
22, Appendix E Pipe Sealant
28, Appendix E Silicone Sealant
EQUIPMENT CONDITION
113581 Lock Up Shift Unit
Main Engine Shutdown (see para. 2-10)
73507 CTD Air Shift Unit
APU Shutdown (see para. 2-12)
119855 Shift Fork Seal
Batteries Disconnected (see para. 4-24.12)
All Wheels Blocked
All Air Tanks Drained
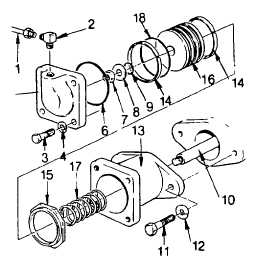
REPLACEMENT
a 4-Wheel Drive Air Shift Unit Replacement
NOTE
Parts for the air shift unit can be bought
separately or as a total unit. The shift unit,
including the shift fork (10), is included in
the replacement unit. If shift fork must be
replaced, request assistance from Direct
Support Level.
(1)
Remove control air line (1) and fitting (2)
from shift unit cover (5).
(2)
Remove capscrews (3) and lockwasher (4)
attaching cover (5) Remove cover and O-
ring (6).
(3)
Remove nut (7), flatwasher (8), and O-ring (9) from shift fork push rod (10).
(4) Remove capscrew (11) and lock washer (12) attaching body (13) to power divider housing. Remove
body (13) and piston (16) assembled.
(5)
Remove spring (17) from shift fork (10).
(6)
Clean old sealant from power divider mounting flange.
NOTE
If air shift unit is repaired, remove piston (16) from body (13). Remove piston stop (15).
Discard all O-rings and felt oilers. Inspect all other components for damage. Replace as
required.
(7)
Inspect new components for nicks, scratches, and other defects before starting installation.
4-576
|