|
| |
TM 5-4210-220-12
4-28. ENGINE - Continued
4-28.3 Air Compressor - Continued
q.
Piston And Connecting Rod Installation.
(1)
Lubricate the cylinder walls and pistons
with engine oil (item 17, Appendix E).
(2)
Remove the rod cap and bearing from the
connecting rod. Stagger ring gaps by 120
deg. Using a ring compressor, insert the
piston so that the top of the piston is flush
with the top of the block.
(3)
Turn the assembly over and position the
connecting rod on the crankshaft journal
making sure bearing inserts are in place.
Lubricate the rod journal with engine oil
(item 17, Appendix E).
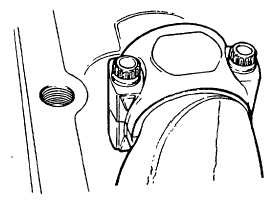
(4)
Install connecting rod bearing caps and
inserts alining the arrows on the bearing
caps and rod as shown. Install connecting
rod bolts, tighten the bolts with 5/16-12
point heads to 185 in. lb (21 Nm), tighten
the bolts with 1/4-12 point heads to 105 in.
lb (12 Nm).
(5)
Repeat steps 1 thru 4 to install the second
connecting rod/piston assembly.
r.
Cover Plate Installation.
(1)
Position cover plate gasket (4) and cover
plate (3) on crankcase (5).
(2)
Install
the
six
capscrews
(1)
and
lockwashers (2).
(3) Tighten the six capscrews (1) evenly to
130 in. lb (15 Nm).
4-548
|