|
| |
TM 5-4210-220-12
4-24 ELECTRICAL SYSTEM - Continued
4-24.2 Starting Motor - Continued
(41)
Slide solenoid into lever housing until mounting holes are alined. Install and tighten solenoid retaining
screws.
(42)
Install field terminal to MTR metal jumper and tighten connector nuts.
(43)
Remove plug from drive end of lever shaft.
(44)
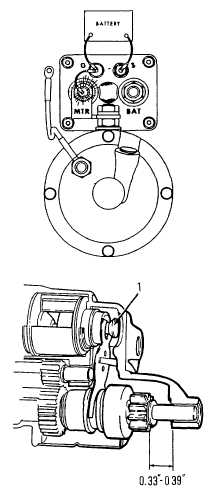
Connect a battery to the G and S terminals of the solenoid. Flash a jumper between G and MTR terminal.
This will activate the solenoid and hold motor in cranking position until battery is disconnected.
(45)
Press on drive assembly and measure end play between pinion and housing.
(46)
Adjust shaft nut (1) until clearance is 0.33 - 0.39 in. (8.3 - 9.9 mm).
(47)
Remove battery and connect frame to solenoid (G) ground wire.
(48)
Replace lever shaft plug and brush inspection plugs.
(49)
Install motor in truck as detailed in INSTALLATION preceding.
4-422
|