|
| |
TM 5-4210-220-12
4-18. PUMP, PIPING, AND VALVES-Continued
4-18.11 Air Actuated Ball Valves-Continued
(5)
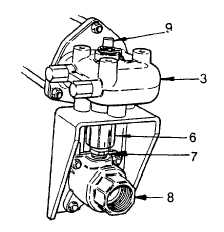
Turn the valve stem so the ball is in the fully open position. Scribe
one mark on the coupling (6) and one mark on the stem nut (7) or
body (8). Be sure the scribe marks will be visible once the actuator
is installed.
(6)
Turn the valve stem counterclockwise until the ball is in the fully
closed position.
(7)
Scribe another mark on the coupling (6) to match up with the mark
on the stem nut (7) or body (8).
(8)
Ensure the actuator (3) is in the fully open or closed position. Using
plier wrench clamped on driver (9) turn it until the driver arm
contacts a stop setscrew.
(9)
Using a plier wrench turn the ball valve to the
position indicated by the actuator indicator.
(10)
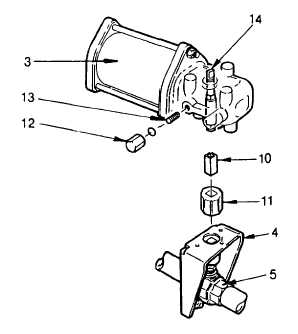
Install the reducer (10) into the coupling (11).
(11)
Install actuator (3) onto mounting bracket (4). Aline
driver (14) with the reducer (10), and aline the
mounting holes. Install capscrews (1) and washers
(2) and tighten until snug.
(12)
Connect air lines as tagged in REMOVAL preceding.
4-246
|


