|
| |
TM 5-4210-220-12
4-18 PUMP, PIPING, AND VALVES - Continued
4-18.5 Water Tank Valve - Continued
REPAIR
Repair of the water tank valve consists of replacement of the major components
These repairs may be carried out with the water tank valve mounted in the truck except as noted
a
Microswitch Repair
(1)
Tag and remove wiring to microswitch.
(2)
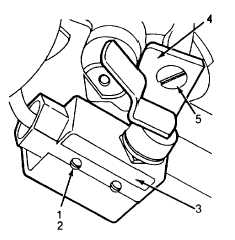
Remove nuts (1) and machine screws (2) that retain the
microswitch (3) to the microswitch bracket (4).
(3)
If microswitch bracket (4) is bent, or distorted remove the one
remaining screw (5). Remove bracket and straighten or
replace.
(4)
Attach new microswitch bracket (4) using screw (5). Leave the
other hole vacant for installation of the support clamp.
(5)
Aline new microswitch (3) with mounting bracket (4).
(6)
Install both machine screws (2) and nuts (1) and tighten firmly.
(7)
Install wiring to the microswitch (3).
(8)
Be sure cab lamp illuminates when valve is open. Adjust microswitch if required.
b.
Shuttle Valve Repair
(1)
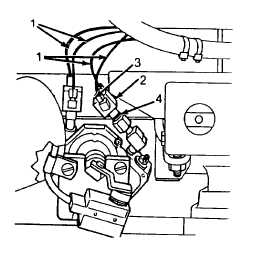
Tag and remove air lines (1) from shuttle valve (2) being replaced.
(2)
Remove both fittings (3) from shuttle valve (2).
(3)
Remove shuttle valve (2) from close nipple (4).
(4)
Inspect air lines (1) for crimps, or wear that may cause air
leaks. Repair or replace as necessary.
(5)
Inspect fittings (3 and 4) for stripped threads or distortion
that may cause air leaks. Replace if necessary.
(6)
Apply pipe sealant (item 22, Appendix E) to threads and
install shuttle valve (2) onto close nipple (4). Position
valve in orientation shown.
4-230
|


