|
| |
TM 5-4210-220-12
4-9 GENERAL MAINTENANCE PROCEDURES - Continued
(7) Wash the lapped part in dry cleaning solvent (item 10, Appendix E) and dry with compressed air.
4-9.4 General Repair/Assembly Instructions.
a.
Truck body
Chassis and exterior painted parts may be resurfaced where paint is damaged or parts have been repaired.
Before resurfacing, scrape off loose and blistered paint. Clean area to be painted by sanding or buffing.
Remove dust. During repair operations, protect bare steel surfaces from rusting with protective oil. Minor body
dents may be removed by bumping with a soft-faced hammer while using a wooden block backing.
b Welding
Welding and brazing may be used to repair cracks in steel parts (e g brackets, panels and light framework) .
Aluminum body panels may also be welded. They should only be welded when replacement parts are not
available. Do not weld or braze castings, moving parts, or parts under great stress, except in emergencies.
Refer to TM 9-237 for welding practices.
c
Hoses
Replace all broken, frayed, crimped or soft flexible hoses. Replace stripped or damaged fittings. When
replacing hose clamps ensure hoses are not crimped.
d
Hose Assemblies
There are two different styles of hose assemblies. Described below are procedures for hose replacement
NOTE
If original hose route cannot be followed at time of replacement, find alternative route and
measure for new hose length
GENERAL PURPOSE - High Temperature, Hydraulic, Air and Fuel Application
(1) Carefully examine both hose end fittings. Discard hose end fittings if any signs of damage are evident.
Proceed to step 4 following to assemble new hose assembly using new hose end fittings.
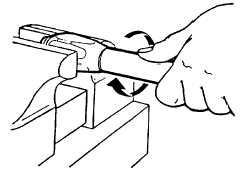
(2) If hose end fittings are to be reused, remove from old hose. Clamp socket in a vise. Remove nipple from
hose and socket by unscrewing in a counterclockwise direction.
(3) Once nipple is removed, invert hose and reclamp socket in vise. Unscrew hose from socket by turning
hose in a clockwise direction. If hose is excessively long, socket removal is possible by clamping hose in vise and
unscrewing socket from hose in clockwise direction.
4-65
|