|
| |
TM 5-4210-220-12
4-22. AIR SYSTEM - Continued
4-22.8 Service Brake Valve.
This task covers
a.
Removal
b.
Installation
c.
Repair
TOOLS
MATERIALS/PARTS
Shop Equipment, Automotive
22, Appendix E Pipe Sealant
Maintenance and Repair,
NSN 4910-00-754-0705
EQUIPMENT CONDITION
Main Engine Shutdown (see para. 2-10)
APU Shutdown (see para. 2-12)
Batteries Disconnected (see para. 4-24)
Truck Wheels Blocked
All Air Tanks Drained
WARNING
Death or serious injury could occur if compressed air is directed against the skin. Always drain all air
tanks via the draincocks prior to maintaining the service brake valve.
NOTE
The service brake valve is installed on the air manifold plate located beneath the dash on the drivers
side of the cab.
To remove whole brake pedal assembly, refer to REMOVAL, steps 1 thru 6. To remove just the
internal parts of the valve, refer to REMOVAL, steps 7 thru 11. Similarly, to install just the internal
parts of the valve, refer to INSTALLATION, steps 4 thru 18. The internal parts of the brake valve can
be removed and repaired with the valve body remaining in the truck.
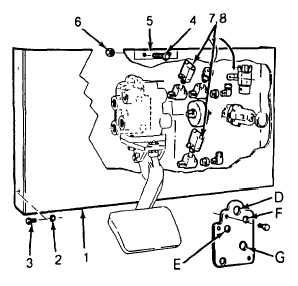
REMOVAL
(1)
Tag and remove wires from the four
pressure switches (7, 8) mounted on the
brake valve.
(2)
Tag and disconnect the three air lines (A, B,
C) connected to the front of the brake
valve.
(3)
Remove bolts (4) and nuts (6) to disconnect
steering support brackets (5) from plate.
(4)
While supporting the plate (1), remove the
six screws (3) and locknuts (2).
(5)
Tag and remove the four hoses (D, E, F, G)
connected to the back of the brake valve.
4-362
|