|
| |
TM 5-4210-233-14&P-1
4-15. CROSSLAY HOSE BIN DIVIDERS
This task covers:
a.
Replace Front Divider
c.
Replace Bed Floor
b.
Replace Rear Divider
TOOLS REQUIRED:
Tool Kit, General Mechanics, Automotive
(Appendix B, Section lll, Item 1)
a.
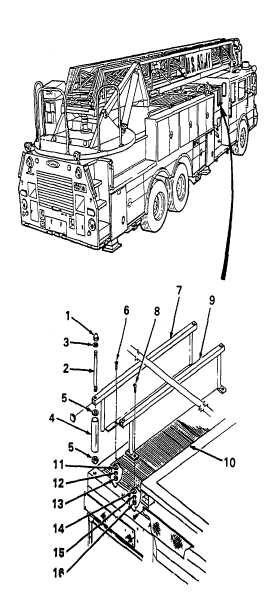
Replace Front Divider.
(1) Remove from top: two acorn nuts (1) with attached
rods (2), flatwashers (3), and tubing (4) with attached
plastic bearings (5).
(2) Remove five screws (6), with flatwashers (11),
lockwashers (12), and nuts (13) from bottom flange
and remove front divider (7).
(3) Install front divider (7), align bottom flange, and install
with
five
screws
(6),
with
flatwasher
(11),
lockwashers (12), and nuts (13).
(4) Install rods (2), with attached flatwashers (3) and nuts
(1), and tubing with plastic bearing (5).
(5) Install assembly in place with acorn nuts (1).
b.
Replace Rear Divider.
(1) Remove from top: two acorn nuts (1) with attached
rods (2), flatwashers (3), and tubing (4) with attached
plastic bearings (5).
(2) Remove two screws (8), with flatwashers (14),
lockwashers (15), and nuts (16) from each end of
bottom flange and remove rear divider (9).
(3) Install rear divider (9) and install with two screws (8),
with flatwashers (14), lockwashers (15), and nuts (16)
on each end of bottom flange.
(4) Install rods (2), with attached flatwashers (3) and nuts
(1), and tubing with plastic bearing (5).
c.
Replace Bed Floor.
(1) Remove front divider (see para a. above).
(2) Remove rear divider (see para b. above).
(3) Lift bed floor (10) from truck.
(4) Install bed floor (10) in location.
(5) Install rear divider (see para b. above).
(6) Install front divider (see para a. above).
4-167
|