|
| |
TM 5-4210-220-34
2-21.
FRONT AXLE - Continued
2-21.2
Differential Carrier - Continued
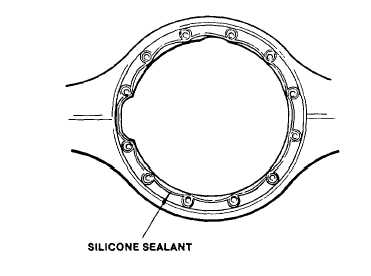
(1)
Apply a 1/8 in. (3 mm) bead of silicone
sealant (item 28, Appendix B) to mounting
flange on axle housing as shown.
(2)
Ensure shift fork (7) is to the side, away
from the differential, and the sliding clutch
is engaged.
(3)
Install
differential
carrier
(11)
in
axle
housing (4) using lockwashers, nuts (9),
and capscrews (8). Tighten nuts to 240 ft
lb (325 Nm). Tighten capscrews to 220 ft lb
(300 Nm).
(4)
Push left and right wheel end assemblies
(3) into axle housing (4). Turn pinion yoke,
if necessary, to line up and engage axle
shaft and differential side gears. Attach
wheel
ends
to
axle
housing
using
lockwashers, nuts (2), and capscrews (1).
(5)
Tighten nuts to 360 ft lb (490 Nm) and tighten capscrews to 220 ft lb (300 Nm).
(6)
Install axle breather (10).
(7)
Install differential lock air shift unit as detailed in TM 5-4210-220-12.
(8)
Install brake air lines, if removed, between frame and wheel-end-mounted brake air chambers.
(9)
Install and adjust tie rod end (6) and steering drag link on left wheel end as detailed in TM 5-4210-220-12.
(10) Remove maintenance trestles and, with truck resting on the floor, tighten pinion shaft yoke nut (12) to 960 ft
lb (1300 Nm).
REPAIR
a.
Differential, Differential Lock, and Ring Gear Repair
NOTE
If ring gear and pinion are considered reuseable, check tooth contact pattern and ring gear backlash
before disassembling differential carrier. See ADJUSTMENT following. Best results are obtained when
established wear patterns are maintained in used gearing. Before disassembling differential carrier, the
effectiveness of the differential lock should be checked.
(1)
Mount differential carrier assembly in a repair stand.
(2)
Remove shift fork seal and spring (53). Remove expansion plugs (54) and drive out shift fork shaft (55).
2-288
|