|
| |
TM 5-4210-233-14&P-1
5-25. WATER PUMP
This task covers:
a.
Removal
e. Assembly
b.
Inspection
f. Installation
c.
Repair
g. Follow-on Maintenance
d.
Disassembly
TOOLS REQUIRED:
EQUIPMENT CONDITION
Tool Kit, General Mechanics, Automotive
Main Engine Shutdown (see para 2-12.)
(Appendix B, Section III, Item 1)
APU Shutdown (see para 2-16.)
Batteries Disconnected (see para 4-114.)
Shop Equipment, Automotive
Engine Enclosure Covers Removed (see para 4-127.)
Maintenance and Repair
Engine Coolant Drained (see para 3-6.)
(Appendix B, Section III, Item 4)
MATERIALS/PARTS REQUIRED:
Pipe Sealant (Item 2, Appendix E)
Grease (Item 1, Appendix E)
Dry Cleaning Solvent (Item 3, Appendix E)
Motor Oil (Item 20, Appendix E)
Seal Retainer (Item 6, Appendix E)
Anti-Seize Compound (Item 4, Appendix E)
Seal Ring and Seals (Fig. 99, Appendix F)
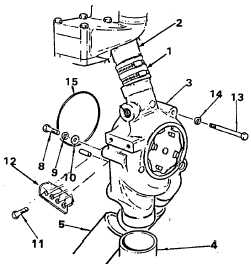
a.
Removal.
(1) Loosen hose clamps and loosen hose (1) between
thermostat cover (2) and water pump housing (3).
(2) Loosen hose clamps and loosen hose (4) between
radiator pipe and water pump housing (3).
(3) Loosen hose clamps and remove hose (5) between
oil cooler pipe and water pump housing (3).
(4) Remove capscrew (8), lockwasher (9), and flat
washer (10) from the rear side of the water pump
housing.
(5) Remove two bolts (11) and pull fuel line bracket (12)
away from pump. Remove tie wraps as necessary.
(6) Remove the two front capscrews (13) and
Iockwashers (14) Use extreme care to prevent
damage to the gear teeth when disengaging the pump
gear from the water pump drive.
(7) Remove seal ring (15) and discard.
5-165
|