|
| |
TM 5-4210-233-14&P-1
5-7. DRIVE SHAFTS, UNIVERSAL JOINTS AND YOKES - Continued
c.
Installation of Drive Shafts.
CAUTION
Ensure that the universal joint bearings stay clean. Contami-
nation induced in bearings will severely cut the service life of the
universal joints.
During installation, damage to universal joint may occur if cross
binds on needle bearings. When tightening the bearing plates,
oscillate the universal joint cross and stop tightening capscrews
at the first sign of resistance.
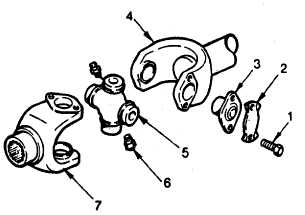
(1)
Remove tape or wire retaining bearing plates and remove these from cross that is to be installed.
(2)
Support end of the drive shaft being installed
using mechanics wire.
(3)
Maneuver the universal joint cross (5) into yoke
so that cross journals are positioned in yoke
lugs (6).
(4)
Install bearing plate (3). Push journal of cross
(5) through the yoke lugs (6) and into needle
bearing in bearing plate.
(5)
While
supporting
the
cross,
to
prevent
separation of cross and bearing, use a
hammer, and with the cross aligned, lightly tap
bearing plate (3) until it is completely installed.
(6)
Install lockstrap (2) and finger tighten both capscrews (1).
(7)
Rotate drive shaft and yoke one half turn to facilitate installation of the second bearing plate.
(8)
Carefully install bearing plate onto the opposite arm of the cross.
(9)
Install lockstrap and finger tighten both capscrews.
(10)
Repeat step 1 at other end of drive shaft.
(11)
Install the second universal joint. Repeat procedure detailed in steps 3 through 9.
(12)
Torque all capscrews (1) to 40 ft lb (54 Nm).
(13)
Secure capscrews by bending up lockstrap tabs.
5-30
|