|
| |
TM 5-4210-233-14&P-1
4-40. FLUSH VALVE
This task covers:
a.
Removal
d.
Assembly
b.
Disassembly
e.
Installation
c.
Cleaning and Inspection
f.
Follow-on Maintenance
TOOLS REQUIRED
EQUIPMENT CONDITION
Tool Kit, General Mechanics, Automotive
Main Engine Shutdown (see para 2-12 .)
(Appendix B, Section III, Item 1)
APU Shutdown (see para 2-16 .)
Batteries Disconnected (see para 4-114 .)
MATERIALS/PARTS REQUIRED
All Piping Drained (see para 2-17 .)
Dry Cleaning Solvent (Item 3, Appendix E)
Curbside Pump Panel Removed (see para 4-26 .)
Grease, Silicone (Item 11, Appendix E)
Cotter Pin (Figure 28, Appendix F)
Repair Kit (Figure 22, Appendix F)
a.
Removal.
NOTE
Access to Flush Valve is gained
through access door on curb-side
pump panel
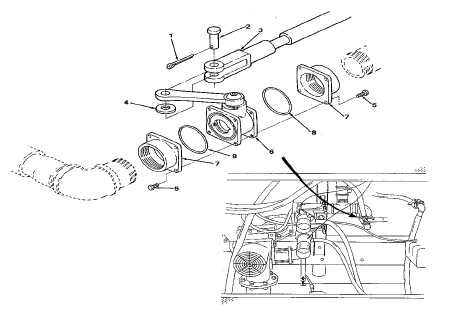
(1)
Remove cotter pin (1) and retaining pin (2).
Discard cotter pin.
(2)
Remove control rod (3) and nylon washer (4).
(3)
Remove eight bolts (5).
(4)
Remove valve (6) from between flanges (7).
(5)
Remove and discard two O-rings (8).
4-212
|