|
| |
TM 5-4210-233-14&P-1
5-66. APU GENERATOR - Continued
(4)
Remove all brush springs (9) and lift the AC brushes (10) from their holders (11).
(5)
Hold both the end bell (12) and frame assembly (13) since they are separate parts, and remove them
as one assembly from the adapter (14). Screwdriver slots in the adapter provide for prying the frame
loose. Be careful not to let the frame assembly rest or drag on the armature.
(6)
Remove air scroll (15) from adapter (14).
(7)
Turn armature through-stud nut (16) and washer (17) out to the end of the through stud (18).
(8)
While pulling the armature (19), outward with one hand, strike a sharp end-wise blow on the nut with a
heavy soft-faced hammer to loosen the armature. If the armature does not come loose, strike the
armature with a sharp downward blow in the center of the lamination stack with a lead or plastic
hammer. Rotate the armature and repeat. Be careful not to hit the collector rings, commutator,
bearing or windings.
(9)
Upon disassembly, all parts should be wiped clean and visually inspected.
b.
Cleaning.
(1)
Clean and inspect all mating surfaces. Surfaces should be free of nicks and dirt.
(2)
Clean mating area between the generator shaft and the engine crank shaft with a thin film of
lubricating oil Molycoat (Item 61, Appendix E), or equal.
c.
Inspection.
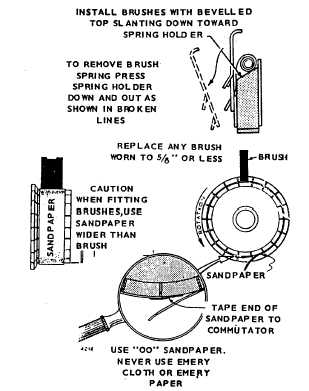
(1)
Brushes. To examine the brushes, remove
the end bell band and cover if not already
disassembled. Replace the brushes when
they wear to the Onan name and part
number. At this point there is about 5/8 in.
(16 mm) of brush remaining. If the brush is
not replaced, the slip rings or commutator
will be damaged. All brushes must have at
least a 50 percent seat. If they don't, sand
as illustrated.
(2)
Commutator And Collector Rings. The
commutator must be clean and in good
condition. If it is dirty, clean with paper or
cloth. Do not use a cleaning solvent
because it will destroy the film. Check the
mica between the commutator bars. If it is
above the level of the bars, undercut it.
5-365
|