|
| |
TRUCK SERVICE MANUAL
TM 5-4210-230-14&P-1
4.
Check cup clearance of compensating port by
watching for surge of fluid in reservoir when pedal is
depressed.
5.
Internal wear or leaks are indicated by pedal fading
away under steady foot pressure (also sign of leak
elsewhere in system).
6.
To check residual check valve operation, depress
and release brake pedal. Open bleeder valve and
check for spurt of fluid indicating pressure in lines.
STOP LIGHT SWITCH
If stop lights are inoperative, it would indicate either
defective bulbs, defective switch, loose or broken connections
or switch improperly positioned.
BRAKE LINES, FITTINGS AND HOSES
1.
Check lines for kinks, dents or rupture.
2.
Check hoses for abrasion, kinks, soft spots, rupture,
collapse, cracks, twists or loose frame supports.
3.
Examine all connections for leaks.
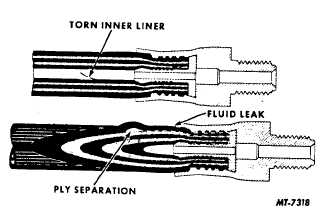
4.
Carefully check for incomplete ruptures indicated by
a bubble between the plys of the flexible hose or a
torn inner line (Fig. 1).
Fig. 1. Flexible Hose Damage
5.
Brake line fittings will sometimes become rusted or
corroded to the wheel cylinder and/or brake line. Be
careful not to twist the line causing a line fracture
during removal or installation. Brake line open ends
should be capped to prevent the entrance of foreign
material.
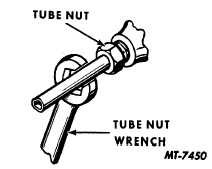
Fig. 2. Use of Tube Nut Wrench
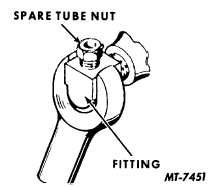
Fig. 3. Protecting Fitting Against Damage During Removal or
Installation
Always use correct type and size of wrench on
fittings (Fig. 2).
Avoid damage to female fittings by supporting fitting
with a spare tube nut during removal or installation
(Fig. 3).
6.
Use only steel tubing when replacement is required.
Use old tubing as a pattern for forming and routing
the new. Avoid kinks and sharp bends when forming
tube. Use tubing cutter to cut tubing to required
length making allowance for flare at each end of the
tube.
Assemble tube nuts on tubing before flaring. After
flaring tube, blow out with air pressure to remove any
particles of dirt or chips.
Do not discard old tube nuts until you are certain that
new ones are available.
WHEEL CYLINDERS
Pull back rubber boots and check for leaks. If
cylinders are disassembled, look for dirt, corrosion or pitting.
CTS-2055S Chapter 1 Page 4
PRINTED IN UNITED STATES OF AMERICA
|