|
| |
TM 5-4210-229-14P
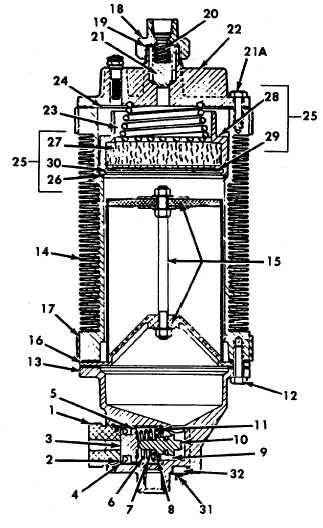
5-21. AIR DRYER REPAIR
This task covers:
a. Disassembly
b. Repair
c. Assembly
INITIAL SET-UP
Tools
Materials/Parts
General Mechanics Tool Kit
Solvent (Appendix D, Item 54)
1/2 Inch Diameter Steel Rod
Lubricant (Appendix D, Item 37)
Equipment Condition
Para. Condition Description
4-168 Air Dryer Removed
DISASSEMBLY
Use care in removing the nut (1) to prevent
bodily injury since nut is spring loaded.
a.
Remove unloader nut (1) and O-ring (2).
b.
Remove piston (3), U-cup (4), sleeve (5) and
spring (6).
c.
Remove retaining ring (7), spring (8), ring seat
(9) and unloader spindle (10) as an assembly as
they are not serviced separately.
d.
Remove the eight cap screws (12) retaining bot-
tom cap (13) to body (14).
e.
Remove bottom cap (13) and deflector as-
sembly (15).
Do not scratch or mar gasket surfaces.
f.
Remove all traces of old gaskets (16 and 17)
from gasket surfaces of bottom cap (13) and
body (14). Discard old gaskets.
Cleaning solvent (Appendix D, Item 54) is both
toxic and flammable. Keep off skin. Use only in
a well-ventilated area and avoid prolonged
breathing of vapors. Keep away from open
flames.
Use care in removing top cap bolts (21 ) to prevent
bodily injury because the cap is spring loaded.
g.
Wash bottom cap (13) and inside of unit (14)
with cleaning solvent (Appendix D, Item 54).
h.
Remove top nut (18). This nut is spring load-
ed.
i.
Remove copper gaskets (19), spring (20), and
check valve spindle (21).
5-50
|


