|
| |
TM5-4210-229-14&P
4-172. VALUES AND SWITCHES REPLACEMENT.
This task covers:
a. Removal
b. Installation
INITIAL SET-UP
Tools
General Mechanics Tool Kit
Equipment Condition ,
Para. Condition Description
4-173 System Bled
General Safety Instructions
Engine OFF.
Transmission in (N) neutral.
Parking brake set.
Battery selector switch OFF.
Tires blocked.
REMOVAL
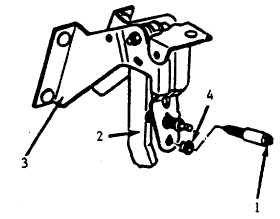
a. Brake pedal switch removal.
(1) Disconnect the electrical connectors at the brake
pedal (2) mounting bracket (3).
(2) Remove the switch (1).
b. Brake valve removal.
(1) Tag and disconnect air lines from valve.
(2) Remove hardware securing valve to frame.
(3) Remove valve from truck.
INSTALLATION
a. Brake pedal switch installation.
(1) Install the switch (1).
(2) Connect the electrical connector.
(3) Depress the brake pedal (2) and press the switch
(1) in until it is firmly seated in the clip (4).
NOTE
Audible clicks can be heard as the threaded portion of
the switch is pushed through the clip.
(4) Pull the brake pedal (2) fully rearward against
the pedal stop until the audible clicks can no
longer be heard.
(5) Release the brake pedal (2), then repeat step c
to assure that the switch is properly seated and
no audible click can be heard.
(6) Electrical contact should now be made when
the brake pedal is depressed to 1-1.24 inches
(25-31 mm) and the brake lights should go on.
(7) Check the operation of the switch.
b. Brake valve installation.
(1) Position valve on frame and secure with
attaching hardware.
(2) Connect all air lines to valve and remove tags.
(3) Check conditions for leaks or loose fittings.
(4) Charge air brake system (paragraph 4-173).
4-189
|

