 |
|||
|
|
|||
|
|
|||
| ||||||||||
|
|
 TM 5-4210-224-14&P
4-101. EXHAUST PIPES REPLACEMENT. (Continued)
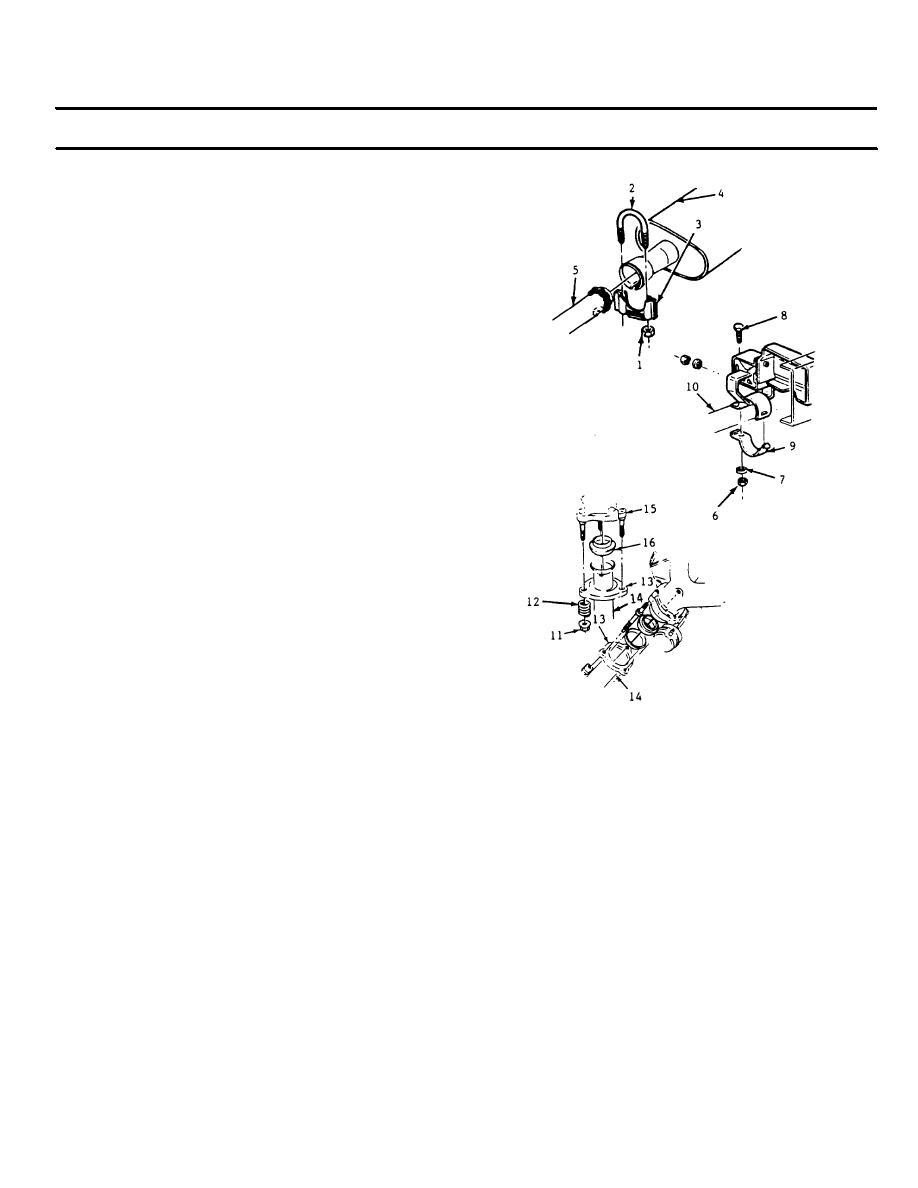
d. Remove the nuts (6), washers (7), bolts (8) and
clamp (9) holding the exhaust pipe (10) to the
frame.
e. Remove the nuts (11), washers (12) and flange
(13) attaching the exhaust pipe (14) to the
manifold (15).
f. Remove the exhaust pipe.
NOTE
When installing the exhaust pipe to the
manifold, always use a new seal ring (16)
and nuts. Be sure to clean the manifold
studs with a wire brush before installing the
nuts.
Sealer is to be applied to all slip-joint
connections.
INSTALLATION
a. Install the exhaust pipe (14) to the manifold (15)
by sliding the exhaust pipe flange (13) on the
exhaust pipe (14) up to the flared end.
b. Slip the seal ring (16) on the exhaust pipe insert.
c. Install washers (12) and insert this assembly
onto the exhaust manifold and start the nuts
(11) by hand. Do not tighten fully at this time.
f. Check and be sure the exhaust pipe assembly is
properly aligned and snug before torquing the
nuts.
with the clamp (3) using the U-bolt (2) and nuts
(1). Do not tighten fully at this time.
g. Torque the exhaust pipe to manifold nuts to 15
ft-lbs (20 N-m).
e. Attach the exhaust pipe to the cross member
frame by installing the clamps (9), bolts (8),
washers (7) and nuts (6). Do not tighten fully at
to 30 ft-lbs (40 N-m).
this time.
nuts to 11 ft-lbs (15 N-m).
j. Lower the vehicle.
4-142
|
|
Privacy Statement - Press Release - Copyright Information. - Contact Us |