|
| |
TM 5-4210-220-34
2-12.
PUMP DRIVE AND PTO.
2-12.1
Power Take Off Unit.
This task covers
a. Repair
b. Overhaul
TOOLS
MATERIALS/PARTS
Shop Equipment, Automotive
10, Appendix B Dry Cleaning Solvent
Maintenance and Repair,
13, Appendix B Emery Cloth
NSN 4910-00-754-0705
21, Appendix B Petroleum Jelly
9, Appendix D Dummy Shaft
22, Appendix B Dexron
28-P-35 Oil Seal
EQUIPMENT CONDITION
22-P-25-2 Gasket, Bearing Cover
PTO Removed (see TM 5-4210-220-12)
28-P-119 Oil Seal
To prevent personal injury or premature bearing failure when removing or installing bearing races, never
exert force through the balls or rollers.
REPAIR
NOTE
Repair to the power take off unit (PTO) is limited to replacement of the bearing cap seal and gasket, and the
bearing cover seal and gasket.
Repair may be made without removing PTO from truck. If not removed from truck, the main engine and APU
must be shutdown, the batteries disconnected and the pump body heat shield removed as detailed in TM 5-
4210-220-12.
a.
Bearing Cap Seal Replacement
(1)
Remove the torque converter housing drain
plug and drain transmission fluid into a clean
pan. During cold weather, run engine until
transmission oil is warm.
(2)
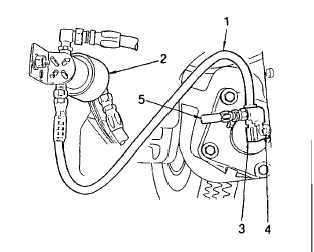
Remove the high pressure line (1) from the
solenoid valve (2) and PTO housing street tee
(3). It will be necessary to disconnect the high
pressure line at the solenoid valve first.
(3)
Remove the dump line (5) from the PTO, and
cover the hose end.
(4)
Tag and remove wiring from pressure switch
(4).
2-64
|